Switch Remote Participant Camera - React
This guide outlines the process of switching camera view (from front camera to back or vice versa) of a remote participant in a meeting. The method involves utilizing a pubsub mechanism to communicate camera changes among participants and creating custom video tracks with the desired resolution.
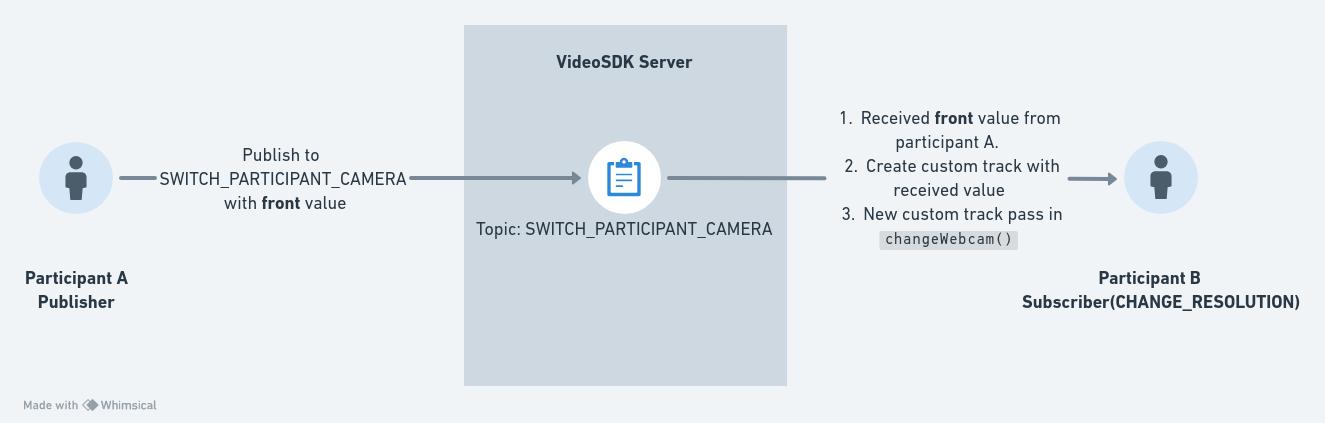
For a clearer understanding, consider this scenario: If participant A wishes to change the camera view of participant B, participant A publishes a topic called SWITCH_PARTICIPANT_CAMERA with either front or back as the value. Participant B subscribes to the SWITCH_PARTICIPANT_CAMERA topic and receives the value shared by participant A. Following this, a custom video track is generated with the new resolution value, and this track is then passed into the changeWebcam() function.
Here's a visual representation to enhance the understanding:
This page uses the following asynchronous methods. Refer to their API reference for the errors each Promise may reject with, and handle these rejections appropriately based on your use case.
Step 1 : Create a Pubsub Topic
- First create a pubsub topic called
SWITCH_PARTICIPANT_CAMERAinParticipantViewComponent for publishing selected camera view value.
import { usePubSub } from "@videosdk.live/react-sdk";

function ParticipantView({ participantId }) {
  // ..

  const { publish: switchCameraPublish } = usePubSub(
    `SWITCH_PARTICIPANT_CAMERA_${participantId}`,
    {
      onMessageReceived: async ({ message }) => {
        console.log("message", message);
      },
    }
  );
}
Step 2 : Create Switch Button
-
Next, create a switch button with
FRONTandBACKoptions on top of the participant grid item. -
Upon clicking the button, publish a pubsub topic with either the
FRONTorBACKvalue to communicate the desired camera facing value.
import { useParticipant } from "@videosdk.live/react-sdk";

function ParticipantView({ participantId }) {
  // ..
  const {
    //..
    isLocal,
  } = useParticipant(participantId);

 return (
  {!isLocal && (
      <div style={{ position: "absolute", top: "1", left: "10" }}>
        <div>
          {[{ value: "front", label: "FRONT", res: "h480p_w640p" },
            { value: "back", label: "BACK", res: "h720p_w1280p" },
          ].map(({ value, label, res }) =>
            label === "FRONT" || label === "BACK" ? (
              <button
                onClick={async (e) => {
                  switchCameraPublish(
                    JSON.stringify({ facingMode: value })
                  );
                  e.stopPropagation();
                }}
              >
                {label}
              </button>
            ) : null
          )}
        </div>
      </div>
  )}
 )
}
Step 3 : Create a SwitchCameraListener Component
Now, create a SwitchCameraListener component to subscribe to the SWITCH_PARTICIPANT_CAMERA topic.
-
Within this component, you will receive either
frontorbackas the value. Based on this value, find the cameraId and the label (eitherfrontorback) from the webcam list. -
On finding the cameraId value, create a customVideoTrack by passing it as the
webcamIdparam value. -
After creating the custom video track with the received value, pass that track into the
changeWebcammethod to initiate the camera view change.
import {
  useMeeting,
  usePubSub,
  createCameraVideoTrack,
} from "@videosdk.live/react-sdk";
import { useMeetingAppContext } from "../context/MeetingAppContext";
import { useEffect, useRef, useState } from "react";
import useMediaStream from "../hooks/useMediaStream";

const SwitchCameraListner = () => {
  const [webcams, setWebcams] = useState([]);
  const webcamsRef = useRef();

  useEffect(() => {
    webcamsRef.current = webcams;
  }, [webcams]);

  const mMeeting = useMeeting();

  const loadWebcams = async () => {
    try {
      const webcams = await mMeeting.getWebcams();

      webcams && webcams?.length && setWebcams(webcams);
    } catch (err) {
      console.error("getWebcams failed:", err);
    }
  };

  useEffect(() => {
    loadWebcams();
  }, []);

  usePubSub(`SWITCH_PARTICIPANT_CAMERA_${mMeeting?.localParticipant?.id}`, {
    onMessageReceived: async ({ message }) => {
      let customTrack;
      const { facingMode } = JSON.parse(message);

      const deviceId = webcamsRef.current.find((webcam) =>
        webcam.label.toLowerCase().includes(facingMode)
      )?.deviceId;
      const label = webcamsRef.current.find((webcam) =>
        webcam.label.toLowerCase().includes(facingMode)
      )?.label;

      try {
        await await mMeeting?.disableWebcam();
      } catch (err) {
        console.error("disableWebcam failed:", err);
      }
      try {
        customTrack = await createCameraVideoTrack({
          cameraId: deviceId,
          facingMode: facingMode,
          optimizationMode: "motion",
          multiStream: false,
        });
      } catch (error) {
        console.log("error in creating custom video track", error);
      }

      try {
        await mMeeting.changeWebcam(customTrack);
      } catch (err) {
        console.error("changeWebcam failed:", err);
      }
    },
  });

  return <></>;
};

export default SwitchCameraListener;
Step 4 : Place the SwitchCameraListener in MeetingContainer
- Finally, render the
SwitchCameraListnercomponent in theMeetingContainerto facilitate the reception and transmission of camera view changes among participants.
function MeetingContainer() {
  //..

  return (
    // ..
    <SwitchCameraListener />
  );

  //..
}
API Reference
The API references for all the methods utilized in this guide are provided below.
Got a Question?  Ask us on discord

