Interview as a Service - React
Interview as a service lets a platform run video interviews for hiring companies. A candidate joins an interview room with one or more interviewers, an observer from the hiring company can watch without taking part, and the interview can be recorded and transcribed for the hiring record.
If you are new to VideoSDK, start with Concept and Architecture and Integrate React SDK, and check Supported Browsers for the devices your candidates use.
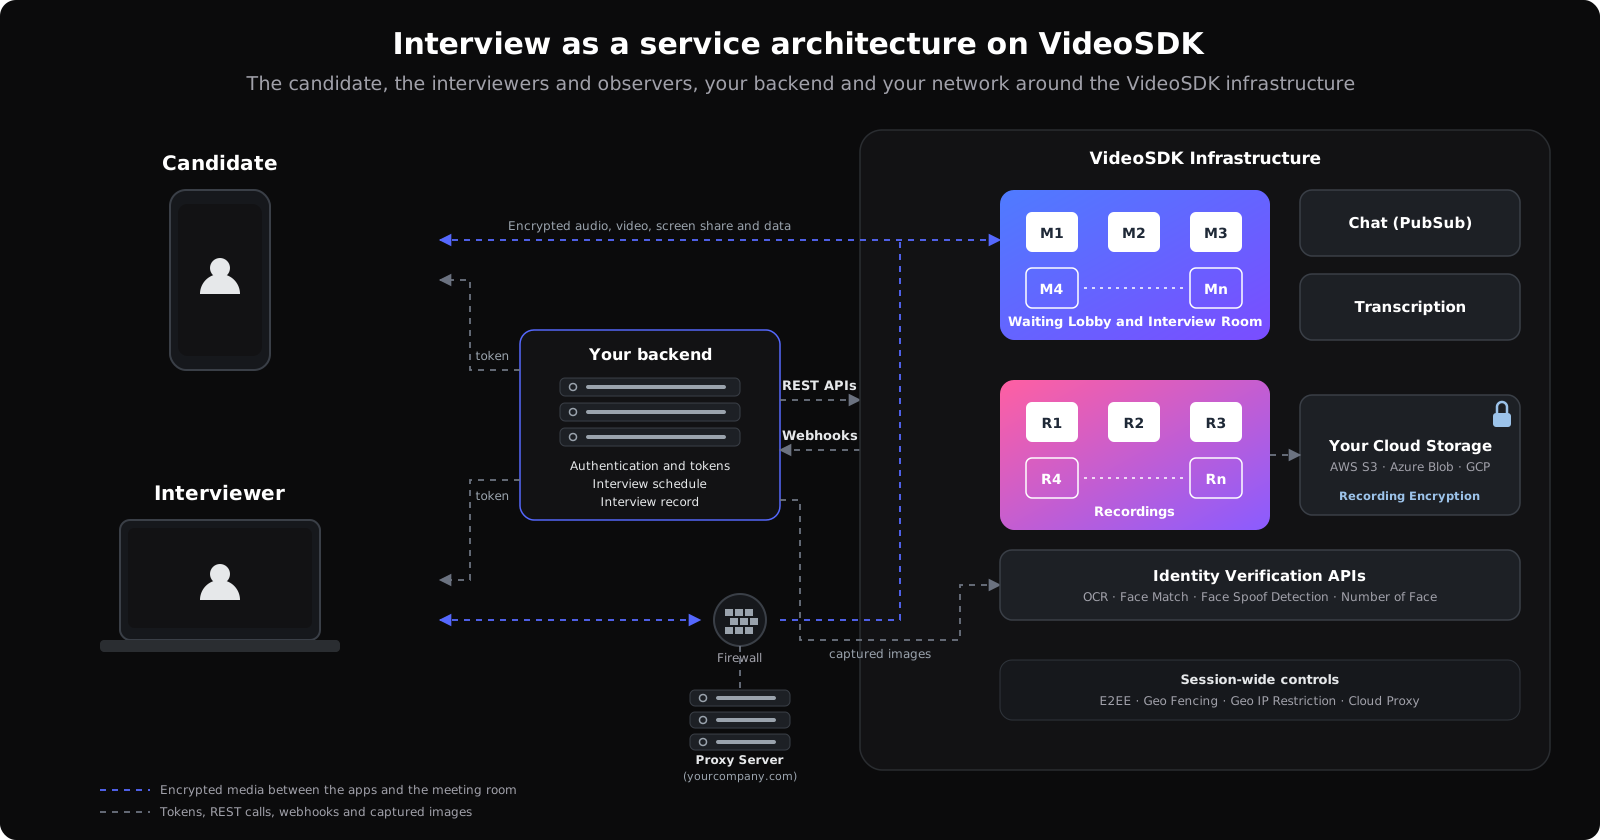
VideoSDK runs the live video, audio, whiteboard, screen share, recording and identity checks for the interview. Your application owns the interview scheduling, the interviewer matching, the notes and scorecards, and the hiring decision.
Set Up the Interview Session
Prepare the room and generate participant tokens on your backend before the interview begins.
- Keep scheduling and interviewers in your backend: VideoSDK does not schedule interviews or match interviewers to hiring companies, so keep both in your platform. Create the room for the interview, issue the tokens when it is due, and move the candidate to the pre-interview screen when the interview is about to start.
- Create a room: Use the Create a Room API to create one room for each interview. Use the returned
roomIdto attach the interview to its schedule and its hiring company in your platform. - Validate the room: Before issuing tokens, use the Validate a Room API to ensure the room is valid and available for the interview. If validation fails, do not issue the tokens, and report the failure to your platform.
- Configure participant permissions: Set
allow_joinandallow_modin each interviewer's token so interviewers can join directly and request access to the candidate's camera or microphone. Setask_joinin the candidate's token so the candidate waits in the lobby until an interviewer admits them. Setallow_joinin observer tokens. IncluderoomIdandparticipantIdin every token payload, withversionset to2. See Authentication and Tokens. - Set participant modes: Join the candidate and the interviewers in
SEND_AND_RECVmode so they publish their camera and microphone. Join observers inRECV_ONLYmode. See Host vs Audience Modes and Manage Roles. - Gate controls by role: Features such as recording, removing a participant and ending the meeting are available to all participants by default. Show these controls only in the interviewer's console to keep interview actions under the interviewers' control.
Configure the Candidate's Devices and Network
Candidates join interviews mostly from laptops and sometimes from phones, often over home networks, and need a setup that works without technical help. Prepare their devices and assess network quality before the interview so a technical problem does not use up interview time, and support device switching during it.
Check Devices and Network Before the Interview

- Check permissions and devices: Provide a pre-interview screen where candidates can grant camera and microphone permissions, preview their camera, and test their microphone and speaker. Use
checkPermissions()andrequestPermission()from theuseMediaDevicehook to manage permissions. UsegetCameras()andgetMicrophones()to list available devices, andonDeviceChangedto refresh the list when a device is connected or disconnected. See Precall Setup. - Assess network quality: Use
runPreCallTest()to evaluate uplink and downlink quality on a scale from 1 (BAD) to 5 (EXCELLENT), along with the factors affecting each score. Use the results to select an appropriate starting media configuration and inform the candidate about potential quality limitations. See Precall Setup. - Apply the verified setup: Pass the selected camera and microphone devices, their enabled states, and the chosen media configuration to
MeetingProviderso the meeting starts with the setup the candidate verified. The configuration can include a custom camera track created withcreateCameraVideoTrack(). See Precall Setup for recommended configurations based on the test results and Optimize Video Tracks. - Join after pre-interview checks: Set
joinWithoutUserInteractiontotrueonMeetingProviderif the candidate has already confirmed they are ready to join from the pre-interview screen. See Join Meeting.
Switch Devices During the Interview
- Allow candidates to change devices: Provide in-interview controls to switch microphones or cameras if a device stops working or the candidate plugs in a headset. Use
getMics()andgetWebcams()from theuseMeetinghook to list available devices and theirdeviceIdandlabel. Pass the selecteddeviceIdtochangeMic()orchangeWebcam(). See Change Input Device.
Configure the Interviewer's Console
The interviewer runs the interview from a console, admitting the candidate, checking who they are, working through questions with them and keeping notes. The console should provide controls for admitting the candidate, collaborating and controlling the interview.

Prepare the Interviewer's Environment Before the Interview
- Check devices and network: Have each interviewer complete the pre-call checks, including
runPreCallTest(), before admitting the candidate. This helps identify device or connectivity issues before the interview begins. See Precall Setup. - Apply a virtual background: Use the Virtual Background plugin to blur the interviewer's background or replace it with an image, such as the hiring company's backdrop. Candidates then see a professional view whether the interviewer is in an office or at home. Apply the effect only to the interviewer's camera so the candidate's video and identity images stay unaltered. Virtual backgrounds are supported on desktop browsers.
- Suppress background noise: Use the Noise Suppression plugin on the interviewer's microphone to reduce background noise and help candidates hear questions clearly.
Admit the Candidate from the Lobby
The waiting lobby only holds the candidate until an interviewer admits them. Your system is responsible for the interview schedule and the interviewer matching, as described in Set Up the Interview Session.
- Admit the candidate: When the candidate joins with an
ask_jointoken, they wait in the lobby until an interviewer admits them. HandleonEntryRequestedin the interviewers' consoles to receive the candidate'sparticipantIdandname. Assign one lead interviewer to callallow()and admit them, so only one console admits the candidate. Both the interviewer and the candidate receiveonEntryRespondedwith the admissiondecision. See Waiting Lobby. - Handle a denied request: If the interviewer denies the request, display an appropriate message to the candidate. Call
leave()in the candidate's application to disconnect them, since they remain connected until your application does so, then return them to your platform. See Leave or End Meeting.
Verify the Candidate's Identity
Confirm that the person in the interview is the candidate who applied, so the hiring company can trust the result. Skip this step if identity was verified earlier in your hiring process. The steps below follow the flow described in Video KYC, with the interviewer reviewing the images and the candidate providing them.
-
Capture the identity document and face: Ask the candidate to show their identity document and face to the camera. The candidate's application captures each image with
captureImage()and sends it to the lead interviewer over PubSub in chunks, addressed only to that interviewer so no other participant receives it. See Capture Identity Documents Remotely and Image Capturer. -
Verify the captured images: Send the images from your backend to the Identity Verification APIs:
- Face Match API compares the candidate's face with the photo you hold on file.
- Face Spoof Detection API checks the capture for signs of spoofing.
- OCR API reads the details on the identity document.
Your application decides whether the candidate passes, fails or needs a manual review by the interviewer. See Verify the Captured Images.
Collaborate with the Candidate
- Draw on a shared whiteboard: Use
startWhiteboard()from theuseWhiteboardhook to open a shared canvas for the interviewer and the candidate. While it is open, the hook'swhiteboardUrlholds the address your application embeds, andstopWhiteboard()closes the canvas when the exercise is over. See Whiteboard. - Share a screen: Use
enableScreenShare()from theuseMeetinghook so the interviewer can share a problem statement or the candidate can walk through their work, which the other side receives throughscreenShareStream. See Screen Share. - Share files: Use
uploadBase64File()from theuseFilehook to upload an assignment or a resume to VideoSDK's temporary storage. Share the returnedfileUrlby publishing it withpublish()over PubSub, and usefetchBase64File()to retrieve the file on the other side. Temporary files are deleted when the meeting ends, so save anything the hiring record needs in your own storage. See File Sharing. - Chat during the interview: Use PubSub for in-meeting chat to share links and instructions. Pass the recipient's
participantIdin thesendOnlyoption ofpublish()for a private message between two people. See Chat using PubSub and Private Chat.
Control the Interview
- Request access to the candidate's media: Use
enableWebcam()orenableMic()from theuseParticipanthook to request camera or microphone access when the candidate's device is off. HandleonWebcamRequestedoronMicRequestedin the candidate's application so the candidate can accept or decline the request. See Toggle Remote Participant Media. - Remove a participant: Use
remove()from theuseParticipanthook to remove someone who should not be in the room, such as an observer who joined by mistake. See Remove Participant. - End the interview: Call
end()from theuseMeetinghook when the interview is complete to end the meeting for all participants. See Leave or End Meeting.
Include Observers
Observers from the hiring company can watch the interview without taking part. An observer joins the same room in receive-only mode, so they see and hear the interview but publish no media of their own.
- Give observers a view-only screen: Use the participant's
modeto show an observer a screen built for watching, with the interview controls left out. See Host vs Audience Modes. - Show interviewers who is watching: An observer appears in the
participantsmap, andonParticipantJoinedfires when they join. In the interviewer's console, list the participants whosemodeisRECV_ONLYas observers and show a count, so interviewers always know who is watching. See Participant Events. - Keep observers out of the candidate's view: In the candidate's application, read each participant's
modefrom theuseParticipanthook and render tiles only for participants inSEND_AND_RECVmode. Observers then do not appear on the candidate's screen, and you can skip their join notices. Tell candidates before the interview that observers may attend. See Rendering Host and Audience Views.
Configure the Interview Screen on Both Sides
These components are built into both the candidate's application and the interviewer's console.
Display the Interview
- Render each person's video: Use the
VideoPlayercomponent to render each person's video. It requests the video quality that matches the tile size, so the interviewer appears large and clear on the candidate's screen and the candidate on the interviewers' screens, and it mirrors the local preview. See Display Audio and Video. - Choose a suitable layout: For a panel interview, use a layout that keeps the whiteboard, the shared screen or the candidate prominent and the other interviewers in smaller tiles. See Layout and Grid Management.
- Keep the interview visible with Picture-in-Picture: Use Picture-in-Picture to keep the interview visible in a floating window when the candidate opens a problem statement or the interviewer opens the candidate's profile. See Picture-in-Picture Mode.
Control Your Own Media
- Give each side microphone and camera controls: Provide microphone and camera controls on both screens using
muteMic()andunmuteMic()andenableWebcam()anddisableWebcam()from theuseMeetinghook, so everyone manages their own media. See Mute / Unmute Mic and On / Off Camera.
Show Participant Status
- Track participant joins and leaves: Use
onParticipantJoinedandonParticipantLeftfrom theuseMeetinghook to update each screen when someone joins or disconnects, so an interviewer knows when the candidate drops out and when an observer arrives. See Participant Events. - Show microphone and camera status: Use
micOnandwebcamOnfrom theuseParticipanthook to indicate whether each participant's microphone and camera are enabled. See Display Audio and Video. - Monitor the incoming video stream: Use
onStreamStateChangedfrom theuseStreamhook to detect when the other side's video stream becomes active, stuck, or frozen, so each side can ask the other to check their connection before continuing. See Monitoring Remote Streams.
Keep the Session Reliable
These controls apply to the candidate's application, the interviewer's console and the observers' view.
Handle Network Changes During the Interview
Network conditions can change during an interview. Candidates may use home or mobile networks, while interviewers may connect through office networks. VideoSDK adapts video quality to available bandwidth and provides network and media events that help your application respond to changing conditions.
- Keep everyone informed: Use the relevant quality events to notify the candidate and the interviewers when network conditions affect video quality and when conditions improve. See Monitoring Network Quality for available events and Optimize for Low Bandwidth Networks for recommendations before and during the interview.
- Show the connection state: Use
onMeetingStateChangedfrom theuseMeetinghook to follow the meeting connection throughCONNECTING,CONNECTED,RECONNECTINGandDISCONNECTED. Show a reconnecting indicator on both screens while the state isRECONNECTING, so the candidate and the interviewers know the interview is recovering rather than over, and return the candidate to your platform when it reachesDISCONNECTED. See Meeting Connection State Events. - Handle image transfer failures: Capturing an image locally is separate from transmitting the video stream, but sending the image to the lead interviewer requires a working network connection. Show a pending state while the image is being transferred. Set a timeout and display an error if the transfer does not complete. Allow the interviewer to retry the transfer or request a new capture, and confirm that the complete image has been received and validated before proceeding with the interview.
Detect a Silent Microphone
- Warn when the microphone stops capturing audio: A candidate's microphone can go silent while it is still on, for example when they answer a phone call in a mobile browser or another application takes over the microphone. Use
onAudioInputSilencefrom theuseMeetinghook to detect this on the candidate's device and show them a warning to check their microphone. Since the event is only raised on the candidate's own device,publish()thedetectedandresolvedstates to the interviewers over PubSub so the console can show that the candidate cannot be heard. Remove the warning when the event reportsresolvedor the candidate turns the microphone off. See Audio Input Silence Events.
Handle Errors and Follow Best Practices
- Handle SDK errors: Use
onErrorfrom theuseMeetinghook to receive error information when a meeting operation fails. Display actionable feedback in the candidate's application and the interviewer's console, and send relevant diagnostic details to your monitoring service so failures across interviews stay visible to your team. Avoid including candidate data in logs. See Error Events. - Follow integration guidelines: Review the User Experience Guidelines and Developer Experience Guidelines to build a reliable, accessible interview experience.
Recording
Configure recording, storage delivery, and encryption based on what the hiring record needs. You can start recording when the candidate is admitted and configure transcription alongside it. If recording is mandatory, verify that it has started before proceeding with the interview. The recording file and the transcript are delivered once the interview ends, so the hiring team can review the interview without having attended it. The recording's delivery destination and encryption depend on your configured storage and encryption settings.
Choose the Recording Type
VideoSDK offers three types of recording. Choose the one that matches what your hiring record needs. See Recording Overview.
- Meeting recording: Records the whole interview, every participant and shared content, into one file with a composed layout, which is the usual record for the hiring team. See Start and Stop.
- Participant recording: Records one participant's audio and video into a single file, such as the candidate alone. Start it with the Start Participant Recording API, and use the matching participant recording API to stop it. See Participant Recording (Individual).
- Participant track recording: Records a single audio or video track of one participant as its own file. Start it with the Start Track Recording API, and use the matching track recording API to stop it. See Participant Track Recording.
Record the Interview
- Start recording automatically: If the interview must be recorded from the beginning, show the candidate and the interviewers a consent notice before the interview, then add a
recordingentry toautoStartConfigwhen creating the room with the Create a Room API. Use this entry to configure transcription, recordingconfig, and the custom recording templatetemplateUrlas needed. See Create a Room. - Wait for recording confirmation: Show a loader on the interviewers' screens until the recording starts. The backend receives the
recording-startedwebhook, while the applications receiveonRecordingStateChangedwithRECORDING_STARTED. If an interviewer starts recording manually usingstartRecording()from theuseMeetinghook, show the same loader until the started status arrives. See Start and Stop and Webhook and Events. - Handle recording failures: VideoSDK sends the
recording-failedwebhook if recording fails while starting, during the interview, or while stopping. If recording fails at the start and recording is mandatory, do not proceed with the interview. If recording is optional, you can continue without it. If recording fails during the interview, you can retry or end the session. To close the room automatically when recording fails, configure theonFailureoption as described below. See Recording Failed Webhook. - Close the room automatically: If recording is mandatory, configure VideoSDK to close the room when recording fails. Add an
onFailureentry to therecordingsection ofautoStartConfig, or include it in the request body when starting recording from your backend. Setactiontoclose-roomand configurewaitTimein seconds. We recommend30seconds. See theonFailureparameter and example request body in Create a Room and Start Recording. - Stop the recording and store the file: The recording stops automatically when the interview ends. To stop it earlier, call
stopRecording()from theuseMeetinghook or the Stop Recording API from your backend. Your backend receives therecording-stoppedwebhook with thefileUrl,filePathandsessionId, so it can attach the file to the interview in your platform. To look the file up later, use the Fetch Recordings API to list the recordings of a room or the Fetch a Recording API to retrieve one by its id. See Webhook and Events.
Store Recordings in Your Own Storage
- Configure your own storage: Use Configure Recording Storage in the dashboard to deliver recordings to your own AWS S3, Azure Blob or GCP bucket. It is set per API key and includes a test step.
- Upload with a presigned URL: When each hiring company needs its recordings in its own bucket, or stored credentials are not allowed, generate a presigned URL on your backend for that company's bucket. Pass it to the Start Recording API, so the recording is uploaded to one object for a limited time.
VideoSDK uploads recordings to your storage with the credentials you set up. If your storage only accepts uploads from approved IP addresses, you will need to approve VideoSDK's static IP addresses. Contact us to request them.
Encrypt and Decrypt Recordings
- Encrypt recordings at rest: Turn on Recording Encryption for the API key in the dashboard, under Cloud Storage Configuration, and provide an RSA public key. Each recording is encrypted with its own AES key before upload.
AES-256-GCMis recommended. - Decrypt with your private key: Each recording arrives as three files: the encrypted recording, the wrapped AES key and a metadata file. Decrypt them on your side with your private key. The guide includes a Node.js example.
Recording Encryption and transcription cannot be enabled together on one API key, since transcription runs on unencrypted recordings. Decide per API key which your hiring record needs before configuring either.
Transcription
Live captions help candidates who are hard of hearing or who interview in a second language, while the post-interview transcript and summary give the hiring team a written record. Transcription is not available for an API key with Recording Encryption enabled.
Show Live Captions
- Display live captions: Use
startTranscription()from theuseTranscriptionhook to start real-time transcription. Each line is delivered throughonTranscriptionTextas speech is transcribed. CallstopTranscription()when captions are no longer needed. See Realtime Transcription.
Generate the Transcript and Summary
- Generate a post-interview transcript and summary: Pass a
transcriptionconfiguration tostartRecording(), setenabledtotrue, and provide asummary.promptthat specifies the sections your reviewers need, such as topics covered, strengths shown, concerns and follow-up questions. Retrieve the transcript and summary using the Fetch Post Transcriptions & Summary API or the webhook URL provided tostartRecording(). Treat the summary as a first draft for the interviewers to review and edit before it enters the hiring record. See Post Transcription & Summary.
Choose the Language
- Set the spoken language: Pass the appropriate language code to
startTranscription(). The default isen. See Supported Languages for available codes, including regional variants such asen-IN,hi, andes-419. - Translate captions when needed: If the interviewer and the candidate speak different languages, use Realtime Translation to help both sides follow the conversation.
Meet Compliance Requirements
Configure these session-wide controls to align your interviews with your hiring companies' data protection policies and regional requirements.
| Requirement | Control |
|---|---|
| Keep media within a region | Use Geo Fencing to restrict connections to VideoSDK servers in your specified regions, regardless of the candidate's location. See Geo Fencing. |
| Allow or restrict access by location | Use Geo IP Restriction to allow or deny access based on the candidate's IP address and your geographic rules, such as a role open to one country. See Geo IP Restriction. |
| Encrypt media end to end | Use E2EE to encrypt media on the sender's device and decrypt it only on the receiver's device, preventing intermediaries, including VideoSDK servers, from accessing the media. Your application is responsible for generating and distributing encryption keys. See E2EE Setup. |
| Meet regulatory requirements | VideoSDK offers GDPR compliance with EU data residency and a Data Processing Agreement for candidates in the EU, and SOC 2 Type II, ISO 27001 and CERT-IN for the vendor reviews that hiring companies run. GDPR compliance and the Data Processing Agreement are available as add-ons. |
If E2EE is enabled and you want to record or transcribe the interview, use a custom recording template. See Customize Recording UI.
- Recording: Build the template with the React or JavaScript SDK and enable E2EE in it using the same key provider and shared key as your application, so the template can decrypt the media for recording. Deliver the key securely from your backend to the template over HTTPS rather than including it in the
templateUrl, then start the recording using the template'stemplateUrl. - Transcription: Use the same template recording for the post-interview transcript and summary, since post transcription runs on the recording file. Realtime transcription is not available when E2EE is enabled.
Firewall and Debugging
Interviewers often connect from office networks behind a firewall, and some candidates may use restricted networks as well. Configure firewall rules before the first interview to ensure the required VideoSDK services are reachable. If a session fails to connect, use the checks below to identify potential network restrictions.
Allow VideoSDK Traffic Through Your Firewall
-
Allow VideoSDK domains: The simplest approach is to allow all subdomains of
*.videosdk.liveover TCP and UDP on all ports. This covers the API, signaling, media, and TURN servers. See Firewall Setup. -
Allow specific hosts and ports: If your network policy requires explicit firewall rules, allow the following hosts and ports. VideoSDK can use the fallback transport when the primary connection is unavailable.
Server Host Primary Fallback API api.videosdk.liveTCP 443 — Signaling *.rm.videosdk.live, or the regional hosts listed in the Firewall Setup guideTCP 443 — Media media.videosdk.liveUDP 40000–60000 TCP 40000–60000 TURN turn.videosdk.liveUDP and TCP 3478 TCP 443 Also allow
sdk.videosdk.liveover TCP 443 if your console loads the SDK or the PubSub worker from the VideoSDK CDN. The full-access policy already covers it. -
Allow the PubSub worker in your Content Security Policy: PubSub runs in a web worker created from a
blob:URL. If the interviewer's console runs under a strict Content Security Policy, allowblob:in theworker-srcdirective, or passpubsubWorkerUrltoMeetingProviderto load a pre-built worker from the VideoSDK CDN or your own domain. See CSP policy for PubSub. -
Use Cloud Proxy for restricted networks: If the required ports cannot be opened, use Cloud Proxy to route media through the proxy servers you specify. Choose UDP over TCP (the default), Force UDP, or Force TCP according to your network restrictions.
Debug Connection Issues
- Test the network before the first interview: Run
runPreCallTest()from the interviewers' office network after configuring the firewall. The test checks whether a call can transmit media in both directions. If it fails despite internet access, review the required hosts and ports above. See Precall Setup. - Check UDP connectivity: Set
preferredProtocoltoTCP_ONLYinMeetingProviderand try connecting again. If the call succeeds over TCP but fails with the defaultUDP_OVER_TCPconfiguration, investigate whether UDP traffic is blocked on the media or TURN ports. You can also configure Cloud Proxy for the affected network. - Inspect connection errors: Use
onErrorfrom theuseMeetinghook to capture the error code and message when a connection fails. Use this information to investigate whether the failure occurred during the API, signaling, or media stage, and forward relevant diagnostics to your monitoring service to identify affected networks. See Error Events. - Verify media flow: Use
getTransportStats()from theuseParticipanthook to inspect transport statistics and check whether traffic is flowing in both directions. If one direction shows no bitrate, investigate the corresponding network path and firewall rules. See Monitoring Transport Stats. - Collect connection logs: Call
setLogLevel()withConstants.LogLevel.DEBUGto collect detailed diagnostics while reproducing the issue. After troubleshooting, restore the log level toINFOorNONEas appropriate. See Log Level.
API Reference
The API references for all the methods and events utilized in this guide are provided below.
- checkPermissions()
- requestPermission()
- getCameras()
- getMicrophones()
- onDeviceChanged
- runPreCallTest()
- enableScreenShare()
- MeetingProvider
- joinWithoutUserInteraction
- createCameraVideoTrack()
- getMics()
- getWebcams()
- changeMic()
- changeWebcam()
- onEntryRequested
- onEntryResponded
- leave()
- captureImage()
- startWhiteboard()
- whiteboardUrl
- stopWhiteboard()
- screenShareStream
- publish()
- uploadBase64File()
- fetchBase64File()
- enableWebcam()
- enableMic()
- onWebcamRequested
- onMicRequested
- remove()
- end()
- VideoPlayer
- muteMic()
- unmuteMic()
- enableWebcam()
- disableWebcam()
- onParticipantJoined
- onParticipantLeft
- micOn
- webcamOn
- onStreamStateChanged
- onMeetingStateChanged
- onAudioInputSilence
- onError
- onRecordingStateChanged
- startRecording()
- stopRecording()
- startTranscription()
- onTranscriptionText
- stopTranscription()
- getTransportStats()
- setLogLevel()
- participants
- Create a Room
- Validate a Room
- Start Participant Recording
- Start Track Recording
- Webhooks List
- Start Recording
- Stop Recording
- Fetch Recordings
- Fetch a Recording
- Fetch Post Transcriptions & Summary
Got a Question?  Ask us on discord

