Live Commerce - React
Live commerce lets a seller demo products to shoppers who watch live, react, ask questions and buy in real time. The seller streams from a studio or a phone, shoppers join from the application and take part through chat, polls, reactions and gifts, and the stream can be recorded and transcribed for a shoppable replay. The stream is built on Interactive Live Streaming (ILS).
This guide also covers very large, watch-only audiences. Follow the stream flow as written, then see Scale to Large Audiences with HLS for the steps HLS adds.
If you are new to VideoSDK, start with Introduction and Integrate React SDK, and check Supported Browsers for the devices your shoppers use.
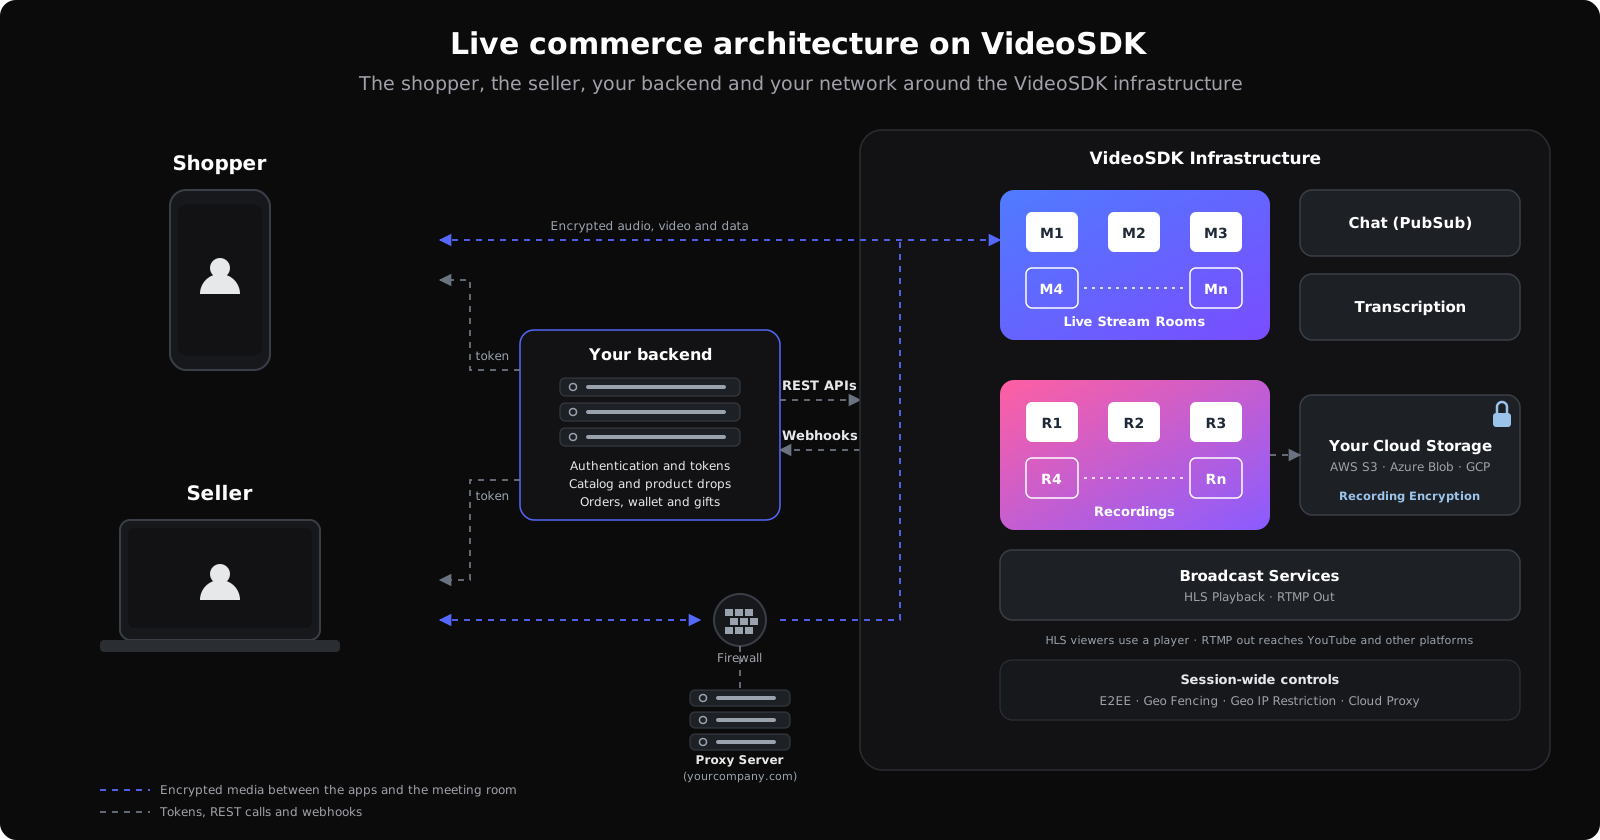
VideoSDK runs the live video, audio, chat, recording and HLS delivery for the stream. Your application owns the product catalog, the drop schedule, orders and payments, the wallet, and the buying experience around the stream.
Set Up the Stream Session
Prepare the room and generate participant tokens on your backend before the seller goes live.
- Keep the catalog and the drop schedule in your backend: VideoSDK does not keep the product catalog, the drop schedule, orders or wallets, so keep them in your commerce backend. Create the room for the drop, issue the tokens when it is due, and open the stream in the application when the seller is ready to go live.
- Create a room: Use the Create a Room API to create a room for each stream. Use the returned
roomIdas the stream ID and attach it to the product drop in your catalog. - Validate the room: Before issuing tokens, use the Validate a Room API to ensure the room is valid and available for the stream. If validation fails, do not issue the tokens, and report the failure to your catalog.
- Set participant modes: Use
SEND_AND_RECVmode for the seller and any co-host so they publish their camera and microphone and see each other. UseRECV_ONLYmode for shoppers so they receive the stream in real time without publishing media of their own and take part through chat, polls, reactions and gifts. See Host vs Audience Modes, Manage Roles and Initialize Live Stream. - Configure participant permissions: Set
allow_joinandallow_modin the seller's token so the seller joins the stream directly and can turn off the camera or microphone of a guest on stage. Setallow_joinin shopper tokens so shoppers join directly. IncluderoomIdandparticipantIdin every token payload, withversionset to2. See Authentication and Tokens. - Gate controls by role: Features such as recording, inviting a shopper on stage and streaming out to social platforms are available to all participants by default. Show these controls only in the seller's console to keep the sale under the seller's control.
Configure the Shopper's Devices and Network
Shoppers join from phones, often over mobile networks and often part way through the stream, and most of them only watch. Keep their path to the stream short.
Check the Network Before the Stream
- Assess network quality: Use
runPreCallTest()to evaluate uplink and downlink quality on a scale from 1 (BAD) to 5 (EXCELLENT), along with the factors affecting each score. The downlink score matters most for a shopper who only watches. Use the results to select an appropriate starting media configuration and tell the shopper what to expect from their connection. See Precall Setup. - Join the stream directly: Set
joinWithoutUserInteractiontotrueonMeetingProviderso a shopper who taps the stream in the application joins at once inRECV_ONLYmode, with no second screen in the way. See Initialize Live Stream. - Hold shoppers on a waiting screen: Show shoppers who open the stream early a waiting screen until the seller is present, rather than an empty room. Switch to the stream when the first
SEND_AND_RECVparticipant joins. See Waiting Screen.
Configure the Seller's Console
The seller runs the sale from a console, presenting products, taking questions and bringing shoppers on stage. The console should provide controls for engaging shoppers, managing the stage, connecting with other streams and controlling the stream.

Prepare the Seller's Stage Before Going Live

- Check devices and permissions before going live: A broadcast goes out as it happens and the seller cannot see what shoppers see, so give the seller a green room screen that confirms a working setup before going live. Use
checkPermissions()andrequestPermission()from theuseMediaDevicehook to check and request camera and microphone access,getCameras()andgetMicrophones()to list devices, andonDeviceChangedto refresh the list when a device is connected. Complete the check with a camera preview and a microphone and speaker test. See Precall Setup. - Assess network quality: Use
runPreCallTest()to evaluate the seller's uplink and downlink quality on a scale from 1 (BAD) to 5 (EXCELLENT), along with the factors affecting each score. Use the results to select an appropriate starting media configuration before the seller goes live. See Precall Setup. - Apply the verified setup: Pass the microphone and camera state, the selected devices and the chosen configuration to
MeetingProvider, so the seller goes live with the setup they just verified. The configuration can include a custom camera track created withcreateCameraVideoTrack(). See Precall Setup for recommended configurations based on the test results and Optimize Video Tracks. - Apply a virtual background: Use the Virtual Background plugin to replace a cluttered back room with a branded backdrop, or to blur it, so shoppers see a clean picture wherever the seller streams from. Virtual backgrounds are supported on desktop browsers.
- Suppress background noise: Use the AI Noise Suppression plugin to filter the noise of a warehouse or a street from the seller's microphone, so shoppers hear the pitch clearly.
- Brand the layout: Use a custom template to give the stream a branded layout, with a product card, a price or a countdown composed into the picture rather than drawn over it on each device. See Customized Live Stream.
Control Your Own Media and Devices
- Give hosts microphone and camera controls: Provide microphone and camera controls for the seller and for guests on stage using
muteMic()andunmuteMic()andenableWebcam()anddisableWebcam()from theuseMeetinghook. See Mute / Unmute Mic and On / Off Camera. - Allow hosts to change devices: Provide in-stream controls to switch microphones or cameras if a device stops working or the seller moves from a webcam to a phone camera. Use
getMics()andgetWebcams()from theuseMeetinghook to list available devices and theirdeviceIdandlabel. Pass the selecteddeviceIdtochangeMic()orchangeWebcam(). See Manage Audio and Video Devices.
Engage Shoppers in Real Time
- Use chat: Chat built on PubSub carries questions, answers and order intent on one channel. Use a group chat to reach everyone, and pass the shopper's
participantIdin thesendOnlyoption ofpublish()for a private chat, so the seller can answer one shopper about sizing without the whole room seeing it. Setpersisttotruewhen publishing messages to retain them for the session. Persisted messages can be downloaded as CSV from the VideoSDK session dashboard for your records. See Chat during Live Stream and Private Chat. - Show reactions: Publish reactions as emojis over PubSub and animate them on every screen, which gives the seller instant feedback when a product lands. See Reactions.
- Run a poll: Publish a poll such as "which color next?" over PubSub, collect the shoppers' votes, and show the result on every screen as votes arrive. Set
persisttotrueon the poll messages so shoppers who join mid-stream see the poll and where the vote stands. See Audience Polls. - Push product cards and offers: Publish a product card, a price drop or a flash sale as a PubSub message so every viewer's application shows it the moment the seller announces it. Set
persisttotrueso the offer also reaches shoppers who join later. See Notify Attendees in Realtime. - Let shoppers send gifts: When a shopper taps a gift, have your backend authenticate the request, check the wallet balance and deduct the cost. Once the payment succeeds, let the shopper's application publish the gift over PubSub so everyone sees the animation. Keeping the transaction on your backend keeps gifting secure and lets you link gifts to leaderboards or rewards. See Virtual Gifts.
Bring Shoppers and Co-Hosts on Stage

- Let a shopper raise a hand: Use a dedicated PubSub topic so a shopper who wants to talk can raise a hand, and list them in the seller's console. See Raise Hand.
- Invite the shopper on stage: Publish the invitation on a PubSub topic addressed to that participant, since
changeMode()only changes the mode of the participant who calls it. When the shopper accepts, have their application switch toSEND_AND_RECVwithchangeMode()and start publishing. See Invite Guest on Stage and Change Mode. - Pin the guest on stage: Handle
onParticipantModeChangedfrom theuseMeetinghook in the seller's application to learn that the shopper is on stage, and callpin()from theuseParticipanthook to put them in the picture for everyone. Callunpin()to return the layout to normal when they switch back toRECV_ONLY. See Pin/Unpin Participant and Manage On-Screen Participants.
Connect with Other Streams
For joint drops, cross-promotions and back-to-back streams, connect your stream with other sessions and platforms.
- Relay a co-host into another stream: Use
requestMediaRelay()from theuseMeetinghook to relay a host's audio, video or screen share into another live stream, for a joint drop or a cross-promotion. See Relay Media (PK Host). - Move viewers to the next stream: Have each viewer's application call
switchTo()from theuseMeetinghook with the next meeting's ID when one stream ends and the next begins, so viewers move to the new session without leaving and rejoining. See Switch Live Stream. - Stream out to social platforms: Use
startLivestream()from theuseMeetinghook, with the platform's stream URL and key, to send the stream out to YouTube, Facebook or any RTMP platform while the interactive stream keeps running in your application. UsestopLivestream()to end it, and handleonLivestreamStateChangedto learn when the stream-out starts and stops. See RTMP Livestream.
Control the Stream
- Control a guest's media: When a guest on stage leaves their microphone open or their camera on after their turn, call
disableMic()ordisableWebcam()from theuseParticipanthook in the seller's console, which requiresallow_modin the seller's token. To ask a guest to turn a device back on, useenableMic()orenableWebcam(), which send a request the guest accepts throughonMicRequestedoronWebcamRequestedin their application. See Toggle Remote Participant Media. - Remove a disruptive shopper: Use
remove()from theuseParticipanthook so the seller can remove a shopper who disrupts the stream. See Remove Participant. - End the stream: When the drop is over, call
end()from theuseMeetinghook to end the stream for every participant. See Leave or End Meeting.
Configure the Stream Screen on Both Sides
These components are built into both the shopper's application and the seller's console.
Display the Stream
- Render only the hosts: Render audio and video for
SEND_AND_RECVparticipants only and nothing for the audience, since only hosts publish media, which keeps the viewer's screen clean and the device's load low. See Rendering Host and Audience Views. - Render each host's video: Use the
VideoPlayercomponent to render each host's video. It requests the video quality that matches the tile size, so the seller fills the shopper's phone while a pinned guest stays in a smaller tile, and it mirrors the local preview. See Display Audio and Video. - Keep the stream visible with Picture-in-Picture: Use Picture-in-Picture to keep the stream visible in a floating window when a shopper opens the product page to buy or the seller opens the order list. See Picture-in-Picture Mode.
- Plan for a large audience: An audience of thousands calls for a deliberate choice of which streams each screen renders and subscribes to. Follow the guidance for large rooms on layout, pagination and subscriptions at that size. See Handle Large Rooms.
Show Participant Status
- Show the viewer count: Use the
participantsmap from theuseMeetinghook to show the number of shoppers watching live on every screen. See Display Attendees Count. - Track participant joins and leaves: Use
onParticipantJoinedandonParticipantLeftfrom theuseMeetinghook to keep the viewer count and the list of guests on stage current as shoppers come and go. See Participant Events. - Show the hosts' microphone and camera status: Use
micOnandwebcamOnfrom theuseParticipanthook to indicate whether the seller's and each guest's microphone and camera are enabled. See Rendering Host and Audience Views. - Monitor the incoming video stream: Use
onStreamStateChangedfrom theuseStreamhook to detect when the seller's video stream becomes active, stuck, or frozen on a shopper's screen, so the application can tell the shopper to check their connection rather than leave. See Monitoring Remote Streams.
Keep the Session Reliable
These controls apply to both the shopper's application and the seller's console.
Handle Network Changes During the Stream
Network conditions can change during a stream. Shoppers often join from mobile networks, while the seller may stream from a studio, a shop or a phone. VideoSDK adapts video quality to available bandwidth and provides network and media events that help your application respond to changing conditions.
- Keep both sides informed: Use the relevant quality events to notify shoppers and the seller when network conditions affect stream quality and when conditions improve. See Monitoring Network Quality for available events and Optimize for Low Bandwidth Networks for recommendations before and during the stream.
- Show the connection state: Use
onMeetingStateChangedfrom theuseMeetinghook to follow the connection throughCONNECTING,CONNECTED,RECONNECTINGandDISCONNECTED. Show a reconnecting indicator on both screens while the state isRECONNECTING, so shoppers know the stream is recovering rather than over, and return to the catalog screen when it reachesDISCONNECTED. See Meeting Connection State Events.
Detect a Silent Microphone
- Warn when the microphone stops capturing audio: The seller's microphone can go silent while it is still on, for example when a phone call comes in on a mobile browser or another application takes over the microphone. Use
onAudioInputSilencefrom theuseMeetinghook to detect this on the seller's device and show a prominent warning in the console. For a guest on stage,publish()thedetectedandresolvedstates to the seller over PubSub, since the event is only raised on the guest's own device. Remove the warning when the event reportsresolvedor the microphone is turned off. See Audio Input Silence Events.
Handle Errors and Follow Best Practices
- Handle SDK errors: Use
onErrorfrom theuseMeetinghook to receive error information when a meeting operation fails. Display actionable feedback in the shopper's application and the seller's console, and send relevant diagnostic details to your monitoring service so failures across streams stay visible to your team. Avoid including shopper or order data in logs. See Error Events. - Follow integration guidelines: Review the User Experience Guidelines and Developer Experience Guidelines to build a reliable, responsive shopping experience.
Recording
Configure recording, storage delivery, and encryption based on what the shoppable replay needs. You can start recording when the seller goes live and configure transcription alongside it. If recording is mandatory, verify that it has started before proceeding with the stream. The recording file, the transcript and the summary are delivered once the stream ends, so the replay can go on the product page with the offers and answers from the stream. The recording's delivery destination and encryption depend on your configured storage and encryption settings.
Choose the Recording Type
VideoSDK offers three types of recording. Choose the one that matches what your replay needs. See Recording Overview.
- Meeting recording: Records the entire stream, every host and shared content, into one file with a composed layout. Record it with the same custom template as the live stream, so the replay carries the branded layout and product cards shoppers saw live. See Record Live Stream and Customized Live Stream.
- Participant recording: Records one participant's audio and video into a single file, such as the seller alone for a clip library. Start it with the Start Participant Recording API, and use the matching participant recording API to stop it. See Participant Recording (Individual).
- Participant track recording: Records a single audio or video track of one participant as its own file. Start it with the Start Track Recording API, and use the matching track recording API to stop it. See Participant Track Recording.
Record the Stream
- Start recording automatically: If the stream must be recorded from the beginning, show viewers a consent notice before the stream starts, then add a
recordingentry toautoStartConfigwhen creating the room with the Create a Room API. Use this entry to configure transcription, recordingconfig, and the custom recording templatetemplateUrlas needed. See Create a Room. - Wait for recording confirmation: Show a loader in the seller's console until the recording starts. The backend receives the
recording-startedwebhook, while the applications receiveonRecordingStateChangedwithRECORDING_STARTED. If the seller starts recording manually usingstartRecording()from theuseMeetinghook, show the same loader until the started status arrives. See Record Live Stream and Webhook and Events. - Handle recording failures: VideoSDK sends the
recording-failedwebhook if recording fails while starting, during the stream, or while stopping. If recording fails at the start and recording is mandatory, do not start the stream. If recording is optional, you can continue without it. If recording fails during the stream, you can retry or end the session. To close the room automatically when recording fails, configure theonFailureoption as described below. See Recording Failed Webhook. - Close the room automatically: If recording is mandatory, configure VideoSDK to close the room when recording fails. Add an
onFailureentry to therecordingsection ofautoStartConfig, or include it in the request body when starting recording from your backend. Setactiontoclose-roomand configurewaitTimein seconds. We recommend30seconds. See theonFailureparameter and example request body in Create a Room and Start Recording. - Stop the recording and store the file: The recording stops automatically when the stream ends. To stop it earlier, call
stopRecording()from theuseMeetinghook or the Stop Recording API from your backend. Your backend receives therecording-stoppedwebhook with thefileUrl,filePathandsessionId, so it can attach the replay to the product page. To look the file up later, use the Fetch Recordings API to list the recordings of a room or the Fetch a Recording API to retrieve one by its id. See Webhook and Events.
Store Recordings in Your Own Storage
- Configure your own storage: Use Configure Recording Storage in the dashboard to deliver recordings to your own AWS S3, Azure Blob or GCP bucket. It is set per API key and includes a test step.
- Upload with a presigned URL: When stored credentials are not allowed, generate a presigned URL on your backend and pass it to the Start Recording API, so the recording is uploaded to one object for a limited time.
VideoSDK uploads recordings to your storage with the credentials you set up. If your storage only accepts uploads from approved IP addresses, you will need to approve VideoSDK's static IP addresses. Contact us to request them.
Encrypt and Decrypt Recordings
- Encrypt recordings at rest: Turn on Recording Encryption for the API key in the dashboard, under Cloud Storage Configuration, and provide an RSA public key. Each recording is encrypted with its own AES key before upload.
AES-256-GCMis recommended. - Decrypt with your private key: Each recording arrives as three files: the encrypted recording, the wrapped AES key and a metadata file. Decrypt them on your side with your private key. The guide includes a Node.js example.
Recording Encryption and transcription cannot be enabled together on one API key, since transcription runs on unencrypted recordings. Decide per API key which your replay needs before configuring either.
Transcription
Live captions help shoppers watching with the sound off or in a second language, while the post-stream transcript and summary list the products shown, the offers made and the questions asked. Transcription is not available for an API key with Recording Encryption enabled.
Show Live Captions
- Display live captions: Use
startTranscription()from theuseTranscriptionhook to turn the seller's speech into captions. Each line is delivered throughonTranscriptionTextto every viewer. CallstopTranscription()when captions are no longer needed. See Live Captioning.
Generate the Transcript and Summary
- Generate a post-stream transcript and summary: Pass a
transcriptionconfiguration tostartRecording(), setenabledtotrue, and provide asummary.promptthat specifies the sections you need, such as products shown, offers and questions asked. Retrieve the transcript and summary using the Fetch Post Transcriptions & Summary API or the webhook URL provided tostartRecording(). See Post Transcription & Summary.
Choose the Language
- Set the spoken language: Pass the appropriate language code to
startTranscription(). The default isen. See Supported Languages for available codes, including regional variants such asen-IN,hi, andes-419. - Translate captions when needed: If shoppers watch from another market, use Realtime Translation to caption the pitch in each shopper's language.
Scale to Large Audiences with HLS
When your audience grows to many thousands and most of them only watch, use HLS to deliver the stream through a player instead of the room. HLS adds a typical delay of 15 to 30 seconds. Everything above, from session setup to the seller's console, recording, transcription, compliance and firewall, applies as written.
- Start and stop HLS: Call
startHls()from theuseMeetinghook to start the HLS output with your chosen layout, quality and orientation, andstopHls()to end it. HandleonHlsStateChangedto show a loader while the state isHLS_STARTINGorHLS_STARTED. AtHLS_PLAYABLE, the event carries theplaybackHlsUrlandlivestreamUrl. See Start HLS and Stop HLS. - Play the stream: Play the
playbackHlsUrlfor shoppers with an HLS player built on hls.js. This URL is the live stream with playback support, so shoppers can go back in the stream. ThelivestreamUrlis the live stream without playback support. See Setup HLS Player. - Show a preview of the stream: While HLS runs alongside the interactive stream, call the Fetch an HLS Thumbnail API from your backend with the room's
roomId. Show the returned image as a preview card in your feed of live streams, so shoppers can see what is on air before they open it. See Generate HLS Thumbnail. - Track HLS from your backend: Your backend receives the
hls-starting,hls-started,hls-playable,hls-stoppingandhls-stoppedwebhooks, so you can mark the stream live in your catalog and show it as ended afterwards. Thehls-playablewebhook carries theplaybackHlsUrlandlivestreamUrl, so your backend can hand the playback URL to shoppers who only watch and never join the room. See Webhooks List. - Control HLS from your backend: To run HLS without a console, use the Start HLS API and the Stop HLS API. Check whether a room's stream is live with the Fetch Active HLS API, retrieve one by its id with the Fetch an HLS API, and remove one you no longer need with the Delete an HLS API. Pair the live check with the thumbnail API to build a listing of live streams with preview cards.
- Let HLS viewers chat: Have shoppers who watch over HLS join the room in
SIGNALLING_ONLYmode, which carries messages and presence without any media, so they can chat and still be counted. Chat, reactions, polls and gifts all travel over PubSub, so they work for these viewers. Bringing a viewer on stage is not possible over HLS. See Chat using PubSub.
Meet Compliance Requirements
Configure these session-wide controls to align your live shopping stream with your organization's data protection policies and regional requirements.
| Requirement | Control |
|---|---|
| Keep media within a region | Use Geo Fencing to restrict connections to VideoSDK servers in your specified regions, regardless of the shopper's location. See Geo Fencing. |
| Allow or restrict access by location | Use Geo IP Restriction to allow or deny access based on the shopper's IP address and your geographic rules, such as a drop that ships to one country. See Geo IP Restriction. |
| Encrypt media end to end | Use E2EE to encrypt media on the sender's device and decrypt it only on the receiver's device, preventing intermediaries, including VideoSDK servers, from accessing the media. Your application is responsible for generating and distributing encryption keys. See E2EE Setup. |
| Meet regulatory requirements | VideoSDK offers GDPR compliance with EU data residency and a Data Processing Agreement for shoppers in the EU, and SOC 2 Type II, ISO 27001 and CERT-IN for marketplace and payment partner vendor reviews. GDPR compliance and the Data Processing Agreement are available as add-ons. |
If E2EE is enabled and you want to record or transcribe the stream, use a custom recording template. See Customized Live Stream.
- Recording: Build the template with the React or JavaScript SDK and enable E2EE in it using the same key provider and shared key as your application, so the template can decrypt the media for recording. Deliver the key securely from your backend to the template over HTTPS rather than including it in the
templateUrl, then start the recording using the template'stemplateUrl. - Transcription: Use the same template recording for the post-stream transcript and summary, since post transcription runs on the recording file. Realtime transcription is not available when E2EE is enabled.
Firewall and Debugging
Sellers often stream from a studio or shop network behind a firewall, and some shoppers may watch from restricted networks as well. Configure firewall rules before the first stream to ensure the required VideoSDK services are reachable. If a stream fails to connect, use the checks below to identify potential network restrictions.
Allow VideoSDK Traffic Through Your Firewall
-
Allow VideoSDK domains: The simplest approach is to allow all subdomains of
*.videosdk.liveover TCP and UDP on all ports. This covers the API, signaling, media, and TURN servers. See Firewall Setup. -
Allow specific hosts and ports: If your network policy requires explicit firewall rules, allow the following hosts and ports. VideoSDK can use the fallback transport when the primary connection is unavailable.
Server Host Primary Fallback API api.videosdk.liveTCP 443 — Signaling *.rm.videosdk.live, or the regional hosts listed in the Firewall Setup guideTCP 443 — Media media.videosdk.liveUDP 40000–60000 TCP 40000–60000 TURN turn.videosdk.liveUDP and TCP 3478 TCP 443 Also allow
sdk.videosdk.liveover TCP 443 if your console loads the SDK or the PubSub worker from the VideoSDK CDN. The full-access policy already covers it. -
Allow the PubSub worker in your Content Security Policy: PubSub runs in a web worker created from a
blob:URL. If the seller's console runs under a strict Content Security Policy, allowblob:in theworker-srcdirective, or passpubsubWorkerUrltoMeetingProviderto load a pre-built worker from the VideoSDK CDN or your own domain. See CSP policy for PubSub. -
Use Cloud Proxy for restricted networks: If the required ports cannot be opened, use Cloud Proxy to route media through the proxy servers you specify. Choose UDP over TCP (the default), Force UDP, or Force TCP according to your network restrictions.
Debug Connection Issues
- Test the network before the first stream: Run
runPreCallTest()from the studio's network after configuring the firewall. The test checks whether a call can transmit media in both directions. If it fails despite internet access, review the required hosts and ports above. See Precall Setup. - Check UDP connectivity: Set
preferredProtocoltoTCP_ONLYinMeetingProviderand try connecting again. If the stream succeeds over TCP but fails with the defaultUDP_OVER_TCPconfiguration, investigate whether UDP traffic is blocked on the media or TURN ports. You can also configure Cloud Proxy for the affected network. - Inspect connection errors: Use
onErrorfrom theuseMeetinghook to capture the error code and message when a connection fails. Use this information to investigate whether the failure occurred during the API, signaling, or media stage, and forward relevant diagnostics to your monitoring service to identify affected networks. See Error Events. - Verify media flow: Use
getTransportStats()from theuseParticipanthook to inspect transport statistics and check whether traffic is flowing in both directions. If one direction shows no bitrate, investigate the corresponding network path and firewall rules. See Monitoring Transport Stats. - Collect connection logs: Call
setLogLevel()withConstants.LogLevel.DEBUGto collect detailed diagnostics while reproducing the issue. After troubleshooting, restore the log level toINFOorNONEas appropriate. See Log Level.
API Reference
The API references for all the methods and events utilized in this guide are provided below.
- runPreCallTest()
- setLogLevel()
- MeetingProvider
- joinWithoutUserInteraction
- createCameraVideoTrack()
- VideoPlayer
- checkPermissions()
- requestPermission()
- getCameras()
- getMicrophones()
- onDeviceChanged
- end()
- muteMic()
- unmuteMic()
- enableWebcam()
- disableWebcam()
- getMics()
- changeMic()
- getWebcams()
- changeWebcam()
- changeMode()
- switchTo()
- requestMediaRelay()
- startLivestream()
- stopLivestream()
- startHls()
- stopHls()
- participants
- enableMic()
- disableMic()
- enableWebcam()
- disableWebcam()
- pin()
- unpin()
- remove()
- getTransportStats()
- micOn
- webcamOn
- publish()
- onParticipantJoined
- onParticipantLeft
- onParticipantModeChanged
- onMeetingStateChanged
- onAudioInputSilence
- onError
- onMicRequested
- onWebcamRequested
- onLivestreamStateChanged
- onHlsStateChanged
- onStreamStateChanged
- startRecording()
- stopRecording()
- onRecordingStateChanged
- startTranscription()
- stopTranscription()
- onTranscriptionText
- Create a Room
- Validate a Room
- Start Participant Recording
- Start Track Recording
- Start Recording
- Stop Recording
- Fetch Recordings
- Fetch a Recording
- Fetch an HLS Thumbnail
- Fetch Post Transcriptions & Summary
- Start HLS
- Stop HLS
- Fetch Active HLS
- Fetch an HLS
- Delete an HLS
- Webhooks List
Got a Question?  Ask us on discord

