Screen Share - iOS
This feature enables hosts to start or stop sharing their screen with other hosts and audience members during the live stream. Only hosts (in SEND_AND_RECV mode) can broadcast their screen, while audience members (in RECV_ONLY mode) can view it in real time.
enableScreenShare()
- By using the
enableScreenShare()function of theRoomclass, the host can share their mobile screen to other hosts and audience members.
disableScreenShare()
- By using the
disableScreenShare()function of theRoomclass, the host can stop sharing their screen to other hosts and audience members.
But before calling the above method, we need to follow the steps below to set up screen sharing.
Create Broadcast Upload Extension in iOS
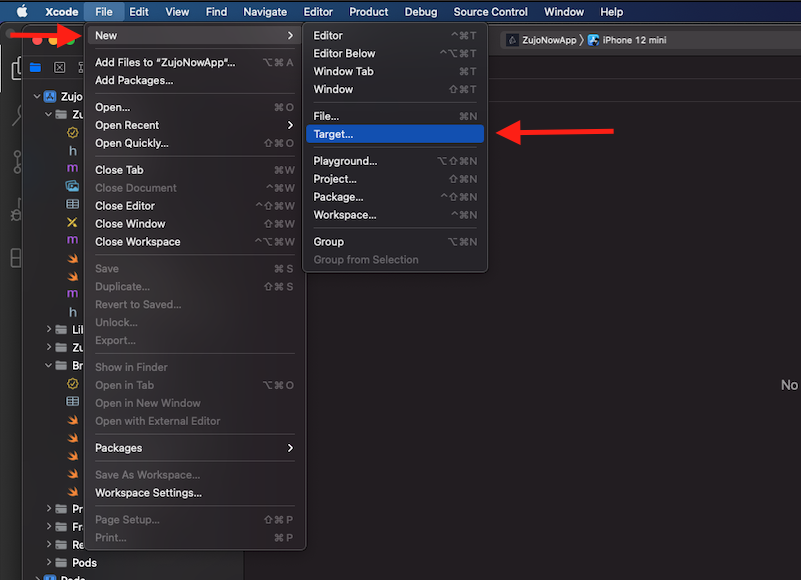
Step 1 : Open Target
Open your project in Xcode, then select File > New > Target in the menu bar.
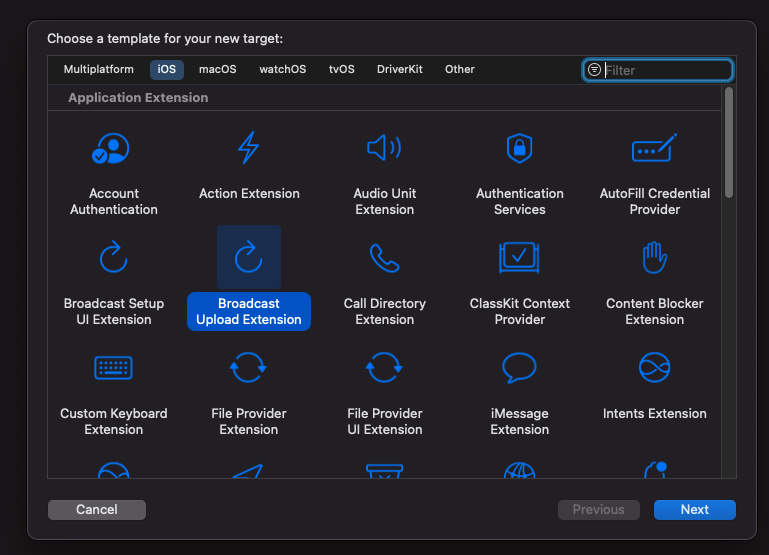
Step 2 : Select Target
Select Broadcast Upload Extension and click next.
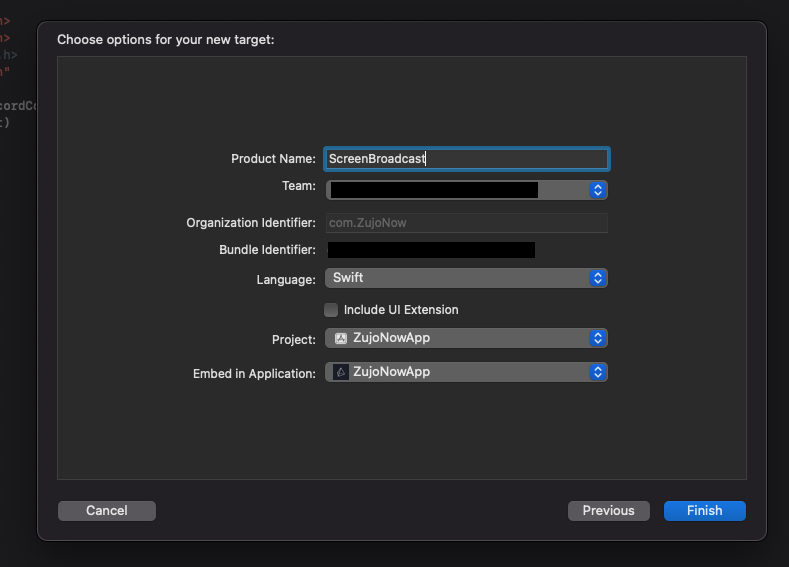
Step 3 : Configure Broadcast Upload Extension
Enter the extension's name in the Product Name field, choose the team from the dropdown, uncheck the "Include UI extension" field, and click "Finish."
Step 4 : Activate Extension scheme
You will be prompted with a popup : Activate "Your-Extension-name" scheme?, click on activate.
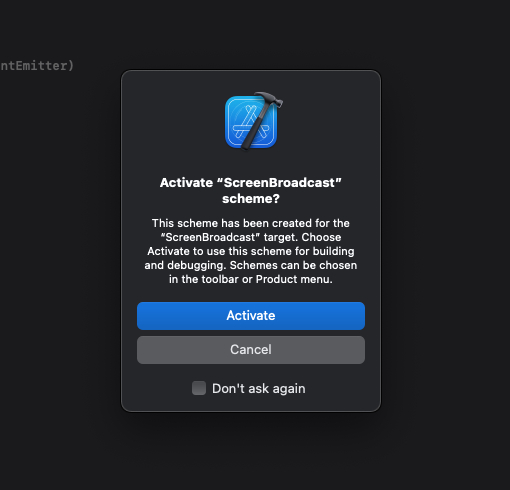
Now, the "Broadcast" folder will appear in the Xcode left side bar.
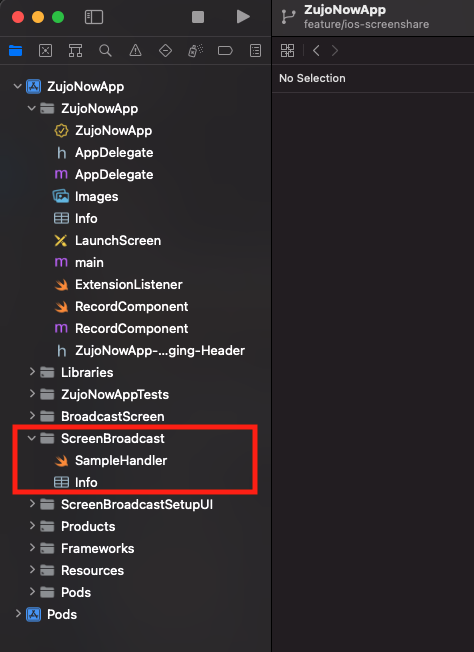
Step 5 : Add External file in Created Extension
Open the videosdk-rtc-ios-sdk-example repository, and copy the following files: SampleUploader.swift, SocketConnection.swift, DarwinNotification.swift, and Atomic.swift to your extension's folder. Ensure that these files are added to the target.
Step 6 : Update SampleHandler.swift file
Open SampleHandler.swift, and copy the content of the file. Paste this content into your extension's SampleHandler.swift file.
Step 7 : Add Capability in App
In Xcode, navigate to YourappName > Signing & Capabilities, and click on +Capability to configure the app group.
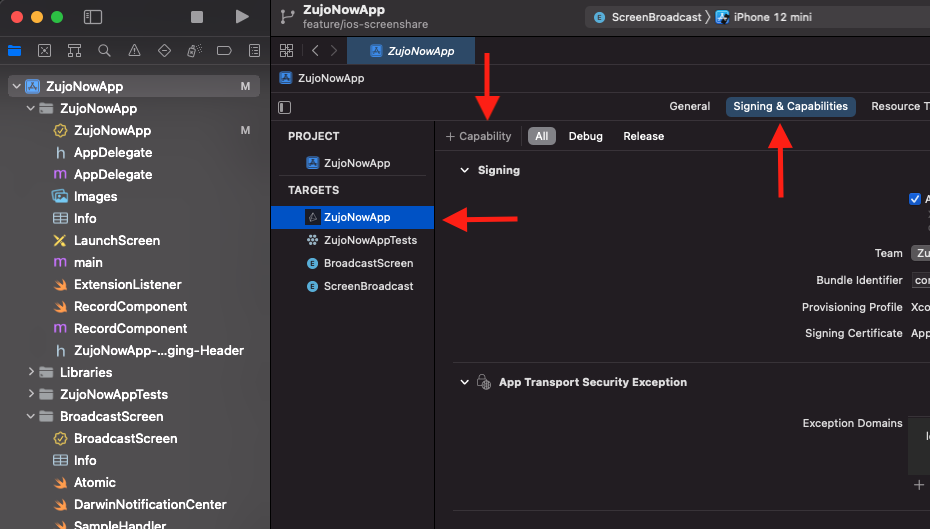
Choose App Groups from the list.
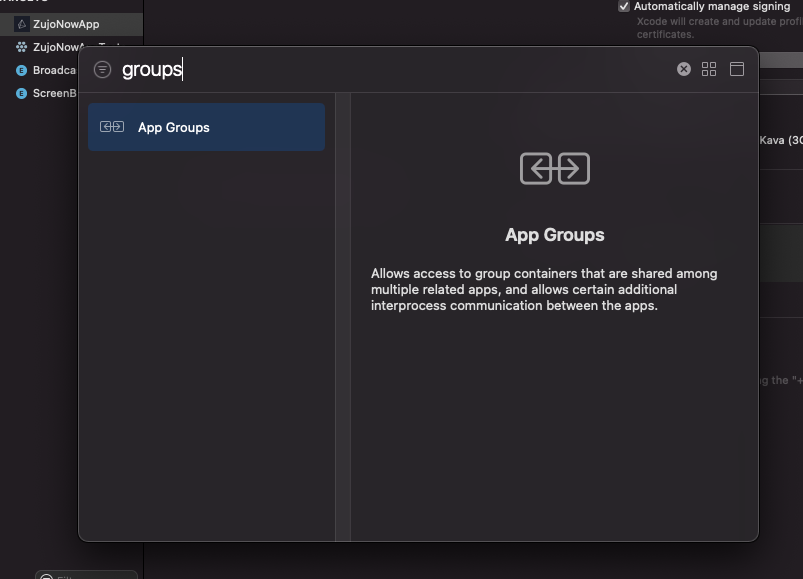
After that, select or add the generated App Group ID that you have created before.
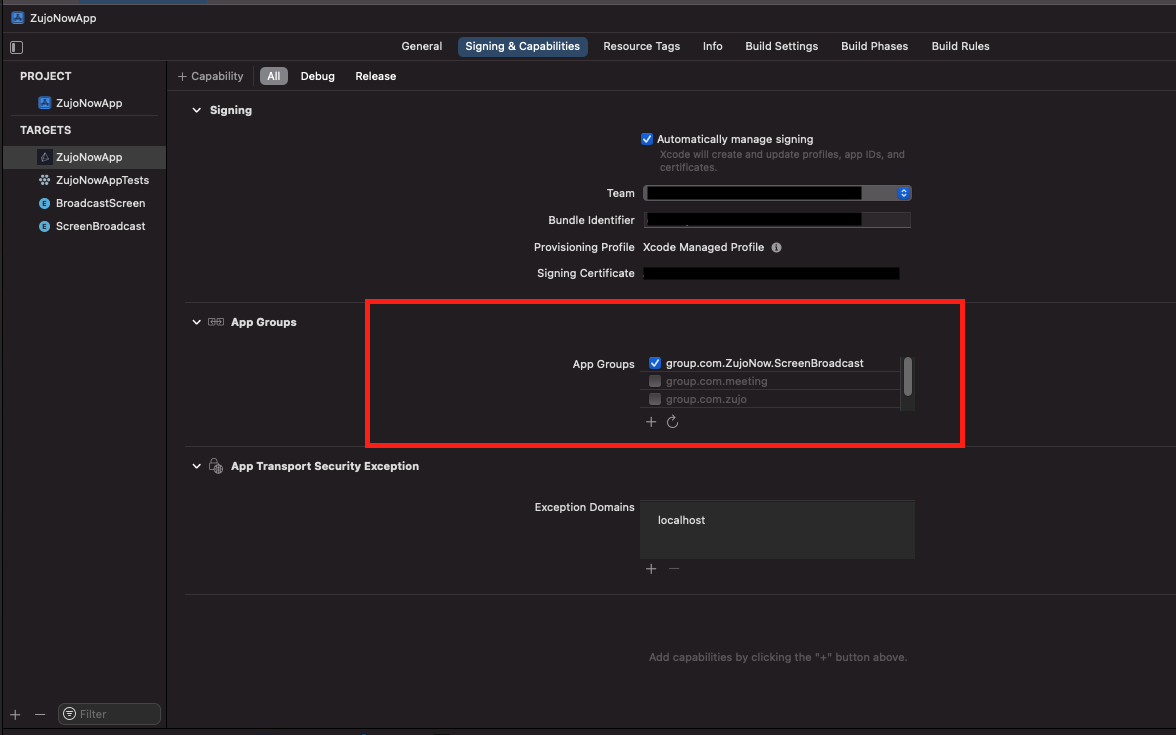
Step 8 : Add Capability in Extension
Go to Your-Extension-Name > Signing & Capabilities and configure App Group functionality as you did in the previous step. (Group id should be same for both targets).
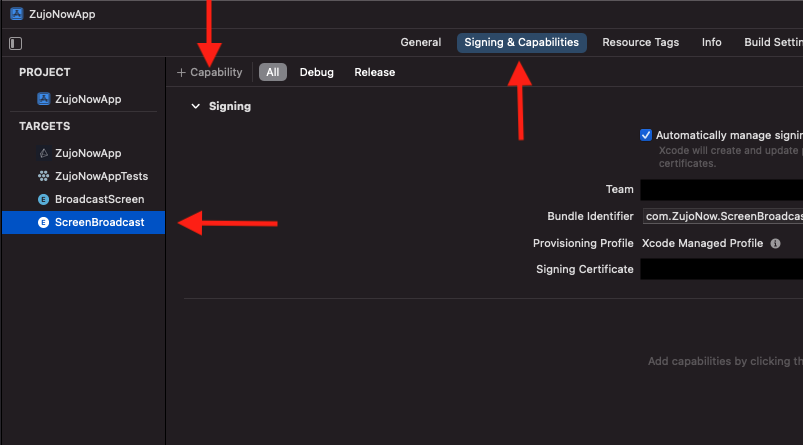
Step 9 : Add App Group Id in Extension File
Go to the extension's SampleHandler.swift file and paste your group ID in the appGroupIdentifier constant.
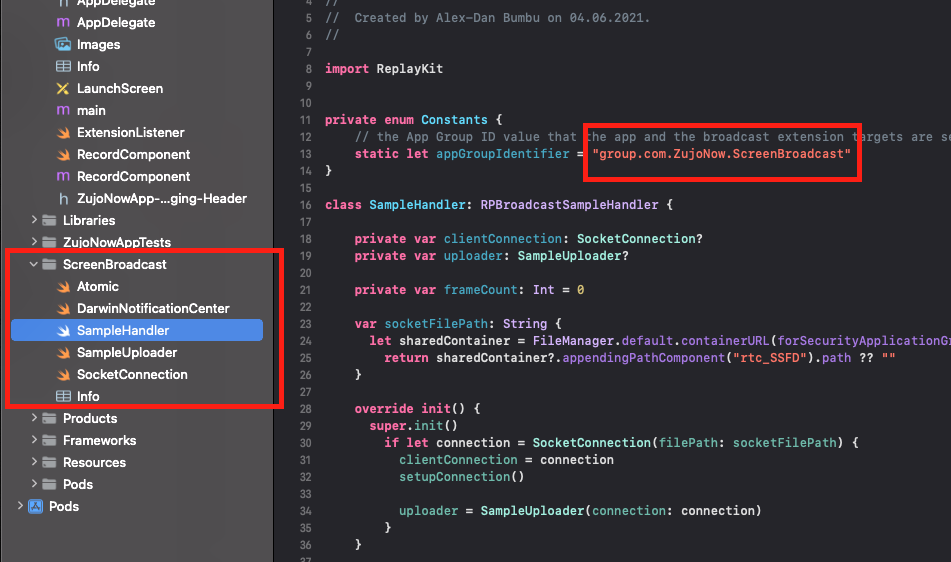
Step 10 : Update App level info.plist file
- Add a new key RTCScreenSharingExtension in Info.plist with the extension's Bundle Identifier as the value.
- Add a new key RTCAppGroupIdentifier in Info.plist with the extension's App groups Id as the value.
Note : For the extension's Bundle Identifier, go to TARGETS > Your-Extension-Name > Signing & Capabilities .
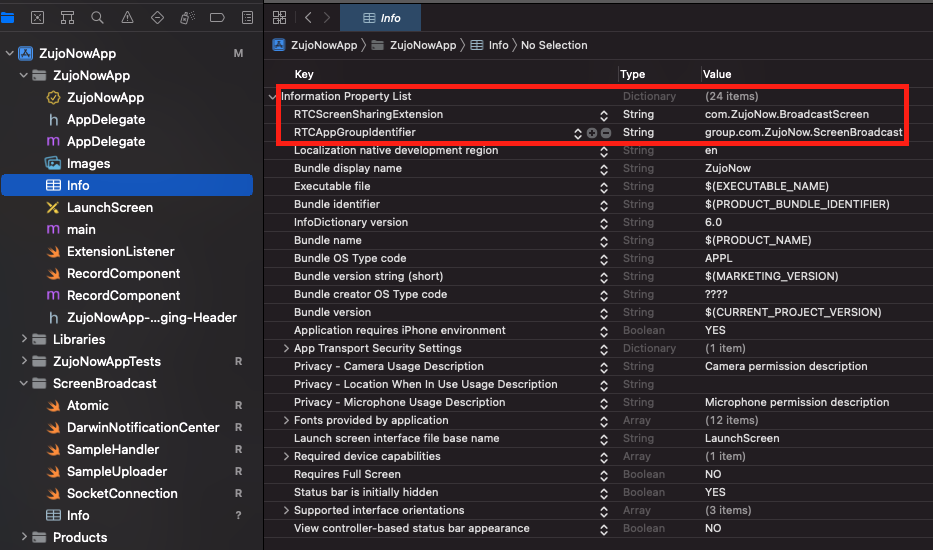
You can also check out the extension's example code on github.
Integrate ScreenShare in your App
After successfully creating Broadcast Upload Extension using the above listed steps, we can start using the enableScreenShare and disableScreenShare functions of the Room class.
How to use the ScreenShare functions
- Swift
@IBAction func ScreenShareButtonTapped(_ sender: Any) {
    Task {
        do {
            try await self.room?.enableScreenShare()
        } catch {
            print("Could not start screen share: \(error)")
        }
    }
}

@IBAction func StopScreenShareButtonTapped(_ sender: Any) {
    Task {
        do {
            try await self.room?.disableScreenShare()
        } catch {
            print("Could not stop screen share: \(error)")
        }
    }
}
The functions enableScreenShare and disableScreenShare are async throws functions; therefore call them with try await inside a Task, as shown above. If the app is not set up for screen sharing, enableScreenShare throws ERROR_GET_DISPLAY_MEDIA. See Errors below.
Calling the enableScreenShare() will prompt a RPSystemBroadcastPickerView with the extension that was created using the above steps.
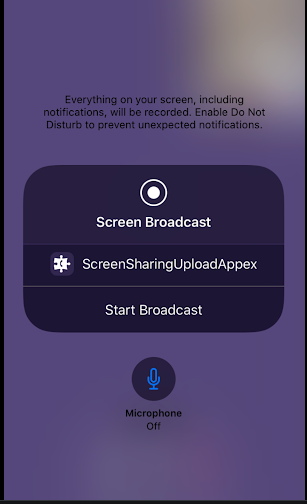
After clicking the Start Broadcast button, you will be able to get the screen share stream in the session.
-
If the host closes the picker without starting the broadcast, call
enableScreenShare()again to show the picker again. If no broadcast starts within about 30 seconds of the picker appearing, the SDK cancels the screen share. -
The host can also stop the broadcast from Control Center. The SDK then ends the screen share for you, so you do not need to call
disableScreenShare(). -
When the broadcast is started, it creates a stream that has
RTCStream.kind == .share. Use the stream kind to show a screen share view on other participants' devices when the local participant starts sharing. -
Similarly, you can use the same kind to dismiss the screen share view on other participants' devices when the screen share stops.
Example
- Swift
extension LiveStreamViewController: ParticipantEventListener {
    /// Participant has enabled mic, video or screenshare
    /// - Parameters:
    ///   - stream: enabled stream object
    ///   - participant: participant object
    func onStreamEnabled(_ stream: RTCStream, forParticipant participant: Participant) {

        if stream.kind == .share {
        // show screen share
            showScreenSharingView(true)
            screenSharingView.showMediastream(stream)
            return
        }

        // show stream in cell
        if let cell = self.cellForParticipant(participant) {
            cell.updateView(forStream: stream, enabled: true)
        }

        if participant.isLocal {
        // turn on controls for local participant
            self.buttonControlsView.updateButtons(forStream: stream, enabled: true)
        }
    }

    /// Participant has disabled mic, video or screenshare
    /// - Parameters:
    /// - stream: disabled stream object
    /// - participant: participant object
    func onStreamDisabled(_ stream: RTCStream, forParticipant participant: Participant) {

        if stream.kind == .share {
        // remove screen share
            showScreenSharingView(false)
            screenSharingView.hideMediastream(stream)
            return
        }

        // hide stream in cell
        if let cell = self.cellForParticipant(participant) {
            cell.updateView(forStream: stream, enabled: false)
        }

        if participant.isLocal {
        // turn off controls for local participant
            self.buttonControlsView.updateButtons(forStream: stream, enabled: false)
        }
    }
}
Check whether you are sharing
-
isScreenSharingof theRoomclass istruefrom the momentenableScreenShare()shows the picker until the screen share ends, whether you end it, the host stops it from Control Center, iOS ends the broadcast, or the SDK cancels it because no broadcast started. -
Use it to drive a single share button, instead of a flag of your own.
-
If the host closes the picker without starting the broadcast,
isScreenSharingstaystrueuntil the SDK cancels the share, about 30 seconds after the picker appeared. With the button below, a tap in that time callsdisableScreenShare(), and the next tap shows the picker again.
- Swift
@IBAction func screenShareButtonTapped(_ sender: Any) {
    Task {
        do {
            if self.room?.isScreenSharing == true {
                try await self.room?.disableScreenShare()
            } else {
                try await self.room?.enableScreenShare()
            }
        } catch {
            print("Screen share failed: \(error)")
        }
    }
}
Screen share quality
-
By default, the screen is shared at 720p and 15 frames per second (
.h720p_15fps). To choose another quality, pass aCustomScreenShareTrackConfigvalue toenableScreenShare(_:). It does not change the quality of the camera video. -
The available values are
.h360p_30fps,.h480p_15fps,.h480p_30fps,.h720p_5fps,.h720p_15fps,.h720p_30fps,.h1080p_15fpsand.h1080p_30fps.
- Swift
Task {
    do {
        // share the screen at 1080p and 15 frames per second
        try await self.room?.enableScreenShare(.h1080p_15fps)
    } catch {
        print("Could not start screen share: \(error)")
    }
}
- To create the settings once and use them for every screen share, create a track with
VideoSDK.createScreenShareVideoTrack(encoderConfig:multiStream:withAudio:)and pass it toenableScreenShare(_:). WithmultiStream: true, the screen share is sent in three quality layers. The default,false, sends one layer. iOS shares no screen audio, sowithAudiois ignored.
- Swift
let screenShareTrack = VideoSDK.createScreenShareVideoTrack(encoderConfig: .h720p_30fps, multiStream: true)

Task {
    do {
        try await self.room?.enableScreenShare(screenShareTrack)
    } catch {
        print("Could not start screen share: \(error)")
    }
}
Errors
enableScreenShare() and disableScreenShare() throw a VideoSDKError when the call is refused:
-
ERROR_ACTION_NOT_SUPPORTED_IN_MODE(3066) fromenableScreenShare()when the participant is inRECV_ONLYmode, as audience members are, or inSIGNALLING_ONLYmode. Only hosts inSEND_AND_RECVmode can share their screen. -
ERROR_GET_DISPLAY_MEDIA(3013) when the app is not set up for screen sharing: Info.plist has no RTCScreenSharingExtension or RTCAppGroupIdentifier key, the app is not in that App Group, or there is no window to show the picker in. Check Steps 7 to 10 above. -
ERROR_ALREADY_IN_REQUESTED_STATE(3054) when the screen share is already on (enableScreenShare()) or already off (disableScreenShare()). -
ERROR_OPERATION_IN_PROGRESS(3055) when the previous broadcast is still stopping. Try again in a moment. -
ERROR_ACTION_PERFORMED_BEFORE_ROOM_JOINED(3035) before you join the live stream, andERROR_ROOM_RECONNECTING(3065) while the live stream is reconnecting.
API Reference
The API references for all the methods and events utilised in this guide are provided below.
Got a Question?  Ask us on discord

