Customized Live Stream - iOS
Custom Template
- A custom template is a template for your live stream that lets you add real-time graphics to it.
- With custom templates, users can create unique and engaging video experiences by overlaying graphics, text, images, and animations onto their live streams. These graphics can be customized to match the branding.
- For example, you can add live scoreboards, social media feeds, and other real-time graphics.
Custom templates can be used with recordings and RTMP service provided by VideoSDK as well.
What you can do with Custom Template
Using a custom template, you can create a variety of modes. Here are a few well-known ones.
-
PK Host:Host can organise player vs player battle. The image below shows a gaming battle. -
Watermark:Host can add & update watermark anywhere in the template. In the image below, we have added a VideoSDK watermark on top right side of the screen. -
News Mode:Host can add dynamic text in lower third banner. In the image below, we have added some sample text in bottom left of the screen.

Custom template with VideoSDK
In this section, we will discuss how Custom Templates work with VideoSDK.
-
Host: The host is responsible for starting the live streaming by passing thetemplateUrl. ThetemplateUrlis the URL of the hosted template webpage. The host is also responsible for managing the template, such as changing text, logos, and switching template layout, among other things. -
VideoSDK Template Engine: The VideoSDK Template Engine accepts and opens thetemplateUrlin the browser. It listens to all the events performed by the Host and enables customization of the template according to the Host's preferences. -
Viewer: The viewer can stream the content. They can watch the live stream with the added real-time graphics, which makes for a unique and engaging viewing experience.

Understanding Template URL
The template URL is the webpage that VideoSDK Template Engine will open while composing the live stream.
The template URL will appear as shown below.

The Template URL consists of two parts:
- Your actual page URL, which will look something like
https://example.com/videosdk-template. - Query parameters, which will allow the VideoSDK Template Engine to join the room when the URL is opened. There are a total of three query parameters:
token: This will be your token, which will be used to join the room.meetingId: This will be the room ID that will be joined by the VideoSDK Template Engine.participantId: This will be the participant ID of the VideoSDK Template Engine, which should be passed while joining the template engine in your template so that the template engine participant is not visible to other participants. This parameter will be added by the VideoSDK.
Above mentioned query parameters are mandatory. Apart from these parameters, you can pass any other extra parameters which are required according to your use-case.
Creating Template
Step 1: Create a new React App using the below command
npx create-react-app videosdk-custom-template
You can use VideoSDK's React or JavaScript SDK to create custom template. Following is the example of building custom template with React SDK.
Step 2: Install the VideoSDK using the below-mentioned npm command.
Make sure you are in your react app directory before you run this command.
npm install "@videosdk.live/react-sdk"

# For the participants' video
npm install "react-player"
App Architecture

Structure of the Project
   root
   ├── node_modules
   ├── public
   ├── src
   │    ├── components
   │          ├── MeetingContainer.js
   │          ├── ParticipantsAudioPlayer.js
   │          ├── ParticipantsView.js
   │          ├── Notification.js
   │    ├── icons
   │    ├── App.js
   │    ├── index.js
   ├── package.json
   .
Step 3: Next we will fetch the query parameters, from the URL which we will later use to initialize the room
function App() {
  const { meetingId, token, participantId } = useMemo(() => {
    const location = window.location;

    const urlParams = new URLSearchParams(location.search);

    const paramKeys = {
      meetingId: "meetingId",
      token: "token",
      participantId: "participantId",
    };

    Object.keys(paramKeys).forEach((key) => {
      paramKeys[key] = urlParams.get(key)
        ? decodeURIComponent(urlParams.get(key))
        : null;
    });

    return paramKeys;
  }, []);
}
Step 4: Now we will initialize the room with the parameters we extracted from the URL. Make sure joinWithoutUserInteraction is specified, so that the template engine is able to join directly into the room, on the page load.
function App(){
...

return meetingId && token && participantId ? (
  <div>
    <MeetingProvider
      config={{
        meetingId,
        micEnabled: false,
        webcamEnabled: false,
        name: "recorder",
        participantId,
      }}
      token={token}
      joinWithoutUserInteraction
    >
      {/* We will create this in upcoming steps */}
      <MeetingContainer />
    </MeetingProvider>
  </div>
) : null;

}
Step 5: Let us create the MeetingContainer which will render the room view for us.
- It will also listen to the PubSub messages from the
CHANGE_BACKGROUNDtopic, which will change the background color of the room. - It will have
Notificationcomponent which will show any messages shared by the host
We will be using the PubSub mechanism to communicate with the template. You can learn more about PubSub from here.
CONFERENCE and VIEWER were removed in iOS SDK 4.0.0. Use SEND_AND_RECV instead of CONFERENCE, and SIGNALLING_ONLY instead of VIEWER. The template below shows only the participants in SEND_AND_RECV mode.
import { Constants, useMeeting, usePubSub } from "@videosdk.live/react-sdk";
import { Notification } from "./Notification";
import { ParticipantsAudioPlayer } from "./ParticipantsAudioPlayer";
import { ParticipantView } from "./ParticipantView";

export const MeetingContainer = () => {
  const { isMeetingJoined, participants, localParticipant } = useMeeting();
  const { messages } = usePubSub("CHANGE_BACKGROUND");

  const remoteSpeakers = [...participants.values()].filter((participant) => {
    return (
      participant.mode == Constants.modes.SEND_AND_RECV && !participant.local
    );
  });

  return isMeetingJoined ? (
    <div
      style={{
        display: "flex",
        flexDirection: "column",
        height: "100vh",
        backgroundColor:
          messages.length > 0
            ? messages.at(messages.length - 1).message
            : "#fff",
      }}
    >
      <ParticipantsAudioPlayer />
      <div
        style={{
          display: "grid",
          gridTemplateColumns: remoteSpeakers?.length > 1 ? "1fr 1fr" : "1fr",
          flex: 1,
          maxHeight: `100vh`,
          overflowY: "auto",
          gap: "20px",
          padding: "20px",
          alignItems: "center",
          justifyItems: "center",
        }}
      >
        {[...remoteSpeakers].map((participant) => {
          return (
            <ParticipantView
              key={participant.id}
              participantId={participant.id}
            />
          );
        })}
      </div>
      <Notification />
    </div>
  ) : (
    <div
      style={{
        display: "flex",
        justifyContent: "center",
        alignItems: "center",
        height: "100vh",
      }}
    >
      <div class="loader"></div>
    </div>
  );
};
Step 6: Let us create the ParticipantView and ParticipantsAudioPlayer which will render the video and audio of the participants respectively.
import { useParticipant } from "@videosdk.live/react-sdk";
import { useMemo } from "react";
import ReactPlayer from "react-player";
import MicOffIcon from "../icons/MicOffIcon";

export const ParticipantView = (props) => {
  const { webcamStream, webcamOn, displayName, micOn } = useParticipant(
    props.participantId
  );

  const videoStream = useMemo(() => {
    if (webcamOn && webcamStream) {
      const mediaStream = new MediaStream();
      mediaStream.addTrack(webcamStream.track);
      return mediaStream;
    }
  }, [webcamStream, webcamOn]);

  return (
    <div
      style={{
        width: "100%",
        height: "400px",
        maxWidth: "600px",
        display: "flex",
        flex: 1,
        alignItems: "center",
        justifyContent: "center",
        position: "relative",
        backgroundColor: "#1A1C22",
        borderRadius: "10px",
        overflow: "hidden",
      }}
      class="video-cover"
    >
      {webcamOn && webcamStream ? (
        <ReactPlayer
          //
          playsinline // extremely crucial prop
          pip={false}
          light={false}
          controls={false}
          muted={true}
          playing={true}
          //
          url={videoStream}
          //
          height={"100%"}
          width={"100%"}
          onError={(err) => {
            console.log(err, "participant video error");
          }}
        />
      ) : (
        <div
          style={{
            fontSize: "50px",
            color: "#fff",
          }}
        >
          {String(displayName).charAt(0).toUpperCase()}
        </div>
      )}
      <div
        style={{
          position: "absolute",
          left: "10px",
          bottom: "10px",
          backgroundColor: "#050A0E",
          color: "#fff",
          padding: "4px",
          borderRadius: "4px",
          alignItems: "center",
          justifyItems: "center",
          display: "flex",
        }}
      >
        {displayName}{" "}
        {!micOn && <MicOffIcon fillcolor="#fff" height="18" width="18" />}
      </div>
    </div>
  );
};
import { useMeeting, useParticipant } from "@videosdk.live/react-sdk";
import { useEffect, useRef } from "react";

const ParticipantAudio = ({ participantId }) => {
  const { micOn, micStream, isLocal } = useParticipant(participantId);
  const audioPlayer = useRef();

  useEffect(() => {
    if (!isLocal && audioPlayer.current && micOn && micStream) {
      const mediaStream = new MediaStream();
      mediaStream.addTrack(micStream.track);

      audioPlayer.current.srcObject = mediaStream;
      audioPlayer.current.play().catch((err) => {});
    } else {
      audioPlayer.current.srcObject = null;
    }
  }, [micStream, micOn, isLocal, participantId]);

  return <audio autoPlay playsInline controls={false} ref={audioPlayer} />;
};

export const ParticipantsAudioPlayer = () => {
  const mMeeting = useMeeting();

  const participants = mMeeting?.participants;

  return participants ? (
    [...participants.keys()].map((participantId) => (
      <ParticipantAudio
        key={`participant_audio_${participantId}`}
        participantId={participantId}
      />
    ))
  ) : (
    <></>
  );
};
Step 7: Let us create the Notification component which will listen to PubSub messages for the topic VIEWER_MESSAGE and show a notification on the lower left corner.
import { usePubSub } from "@videosdk.live/react-sdk";
import { useEffect, useRef, useState } from "react";

export const Notification = () => {
  const timeoutRef = useRef(null);
  const handleChatMessage = (msg) => {
    if (timeoutRef.current) {
      clearTimeout(timeoutRef.current);
    }
    setMessage(msg);
    timeoutRef.current = setTimeout(() => {
      setMessage(null);
    }, 3200);
  };
  const [message, setMessage] = useState(null);
  const { publish } = usePubSub("VIEWER_MESSAGE", {
    onMessageReceived: handleChatMessage,
  });
  useEffect(() => {
    return () => {
      if (timeoutRef.current) {
        clearTimeout(timeoutRef.current);
      }
    };
  }, []);
  return message ? (
    <div
      style={{
        backgroundColor: "#232830",
        padding: "10px",
        textAlign: "center",
        color: "#fff",
        position: "absolute",
        bottom: "50px",
        left: "30px",
        borderRadius: "10px",
        animation: "fadein 0.5s",
      }}
    >
      <strong>
        {message.senderName} says {message.message}
      </strong>
    </div>
  ) : null;
};
For the CSS stylings and animations used in the project, please refer to this file.
Step 8: Once tested, you can deploy it using your backend or host it on services like firebase or vercel.
You can check out the GitHub repository for sample custom template we just created here.
Setup Livestream Using Custom Template
- To use Custom Template, you will need Host and Viewer setup from where the host will start the livestream and viewer can watch them.
- You can clone this example and run it on your system.
git clone https://github.com/videosdk-live/quickstart.git
- The cloned example contains the iOS project in the
ios-custom-template-managerdirectory, which has to be run. Openios-hls.xcodeprojfrom that directory in Xcode. The example uses iOS SDK 3.x. The Migration Guide lists what changed in 4.0.0.
cd quickstart/ios-custom-template-manager
- To use the custom template which we just deployed, we will call the Start HLS API instead of the
startHLS(config:transcription:)method of theRoomclass, because that method does not take a template URL. The example you cloned already makes this call.
HLSUrl has two URLs, playbackHlsUrl and livestreamUrl. Both are optional, so unwrap them before use.
- Swift
func startHLS(roomId: String, token: String) {
  //Update your Custom Template URL here if you have deployed your own, if not deployed you can use this template from our URL.
    let templateUrl = "https://lab.videosdk.live/react-custom-template-demo?meetingId=\(roomId)&token=\(token)"

    let body: [String: Any] = [
        "roomId": roomId,
        "templateUrl": templateUrl,
        "config": [
            "orientation": "portrait"
        ]
    ]

    guard let url = URL(string: "https://api.videosdk.live/v2/hls/start") else { return }

    var request = URLRequest(url: url)
    request.httpMethod = "POST"
    request.setValue("application/json", forHTTPHeaderField: "Content-Type")
    request.setValue(token, forHTTPHeaderField: "Authorization")
    request.httpBody = try? JSONSerialization.data(withJSONObject: body)

    URLSession.shared.dataTask(with: request) { data, response, error in
        if let error = error {
            print("API Error:", error.localizedDescription)
            return
        }
        guard let data = data else {
            print("No response data")
            return
        }
        do {
            let json = try JSONSerialization.jsonObject(with: data, options: [])
            print("HLS Response:", json)
        } catch {
            print("JSON Parse Error:", error)
        }
    }.resume()
}
-
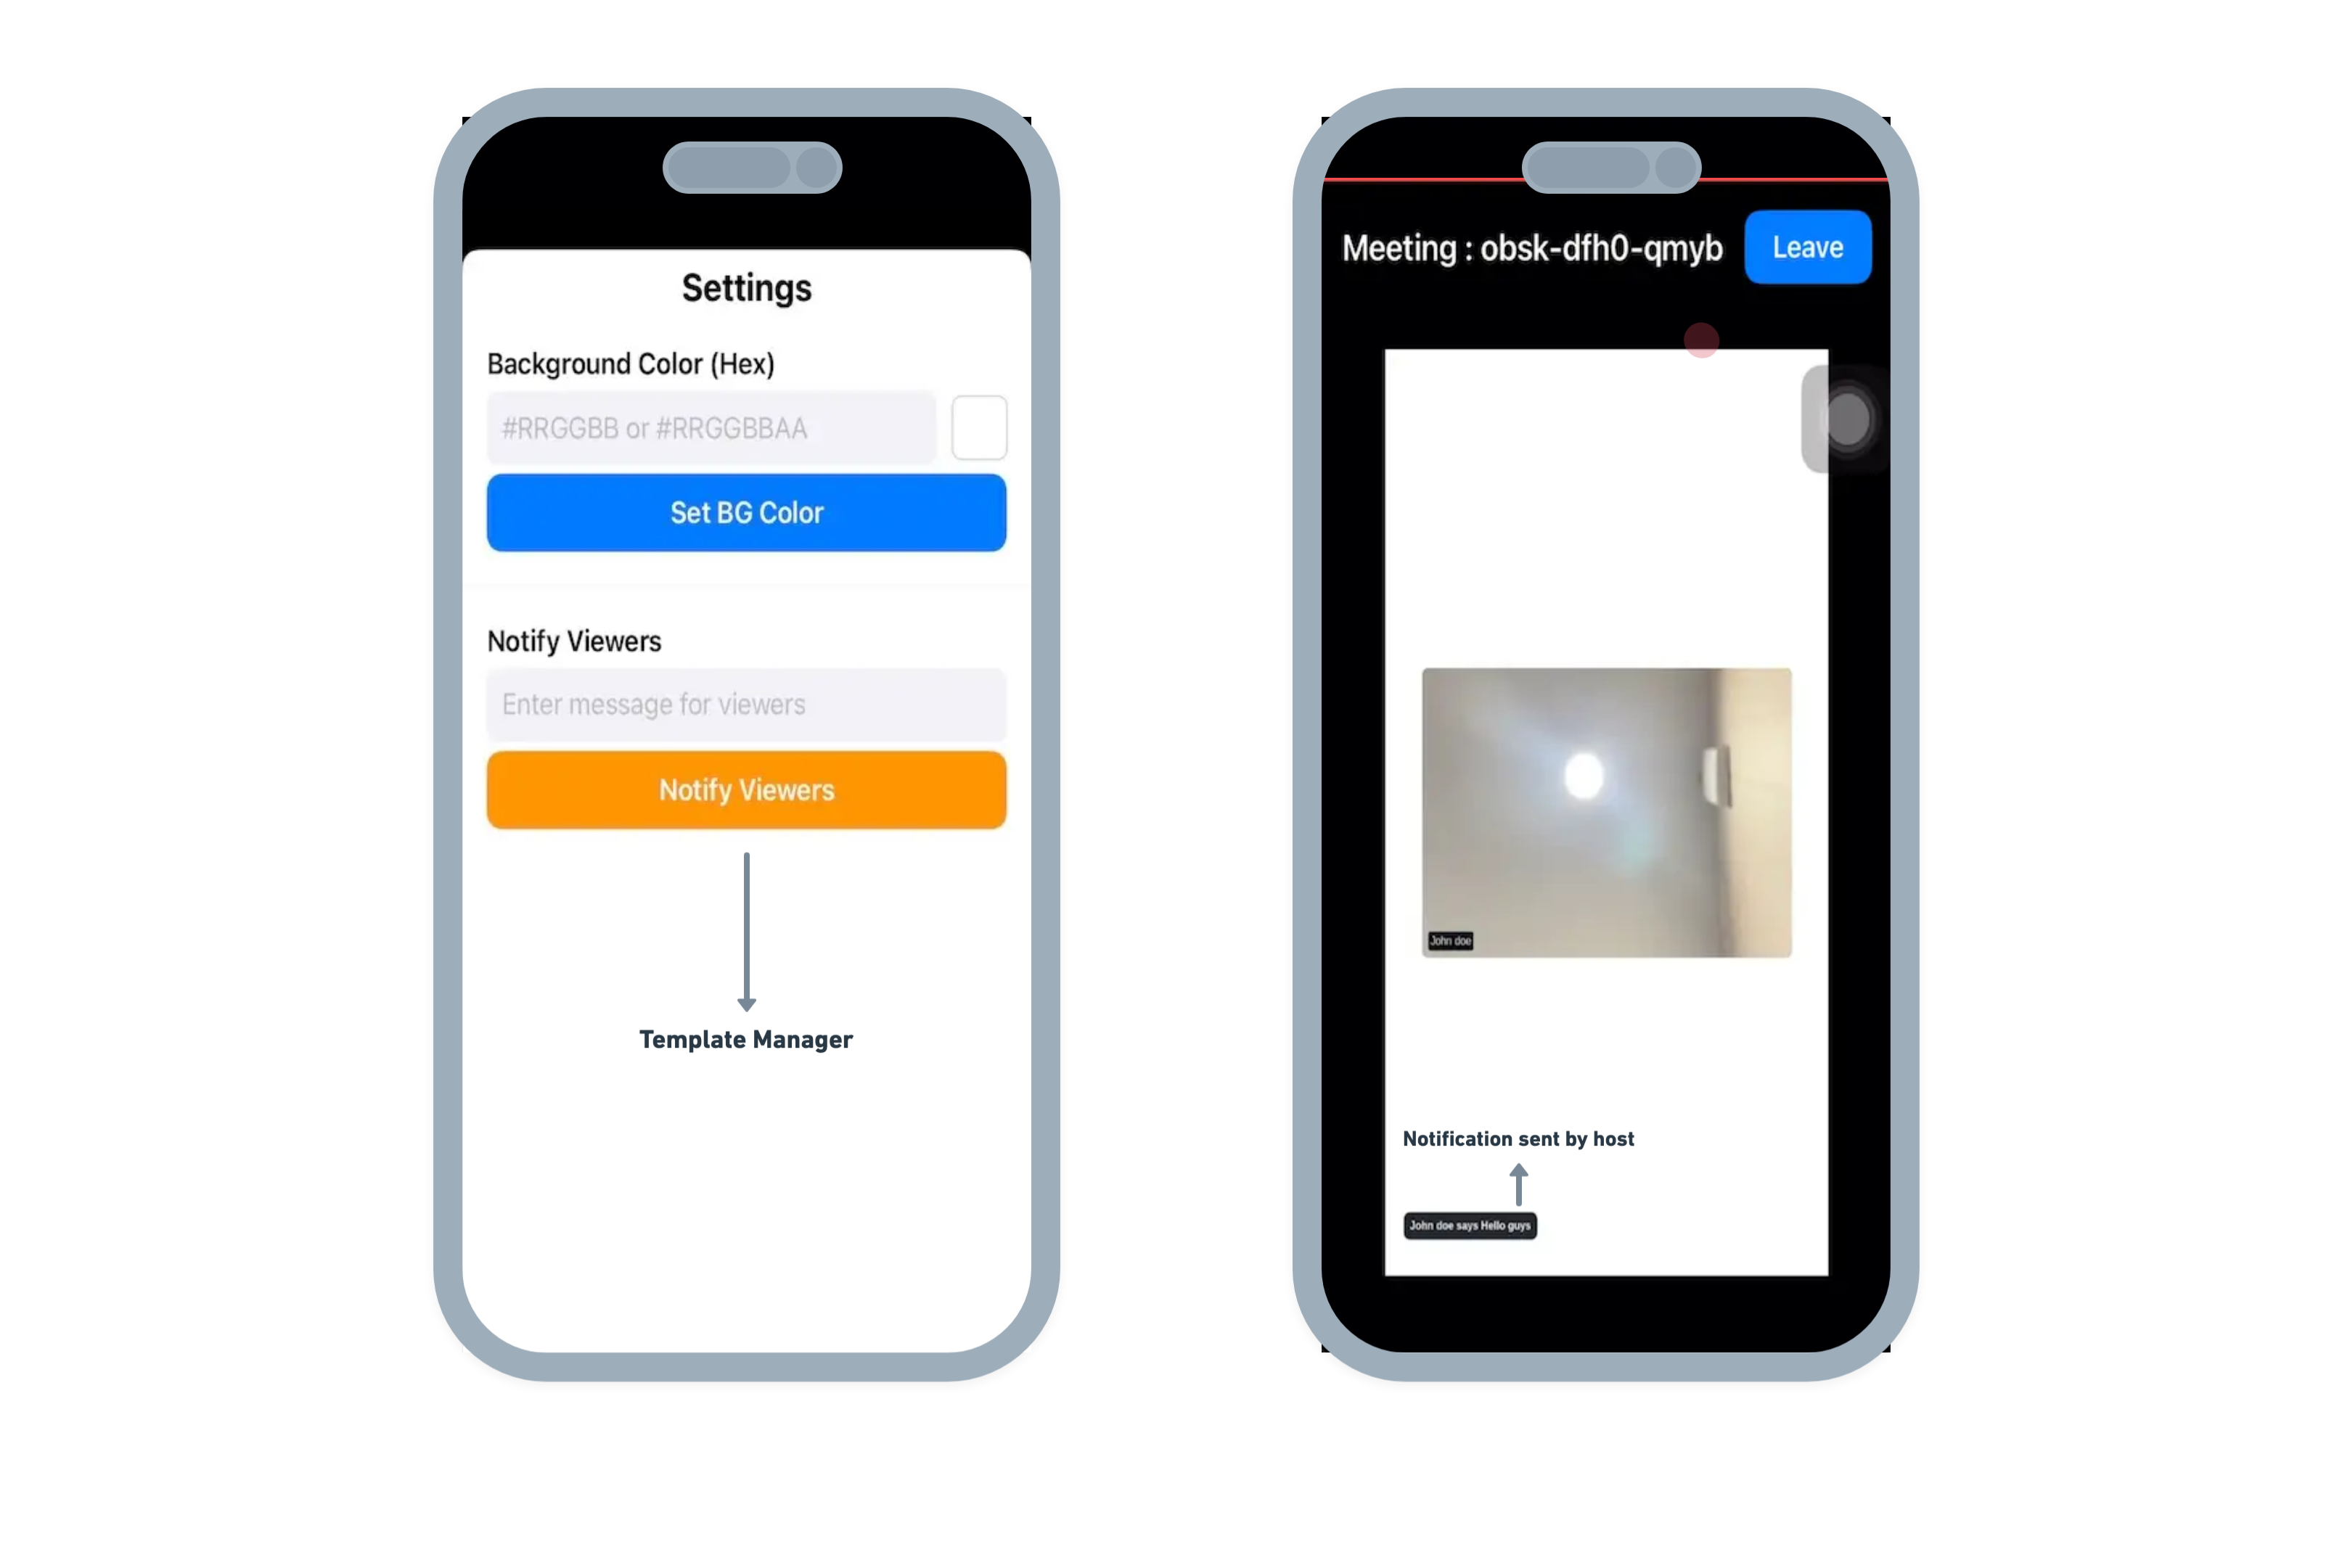
This example has two options on the Host side which will allow them to change the background and send the messages to the viewer.
-
Let's give this example a test run.
You can check out this iOS example code for custom template manager on GitHub
API Reference
The API references for all the methods utilized in this guide are provided below.
Got a Question?  Ask us on discord

